Hello Sunshine

Hi everyone. I’m here with a card featuring some older Simon Says Stamp products. I am entering this card for the Simon Says Stamp Wednesday Challenge. 

The theme for this week is Summer Sunshine

Here is my card –

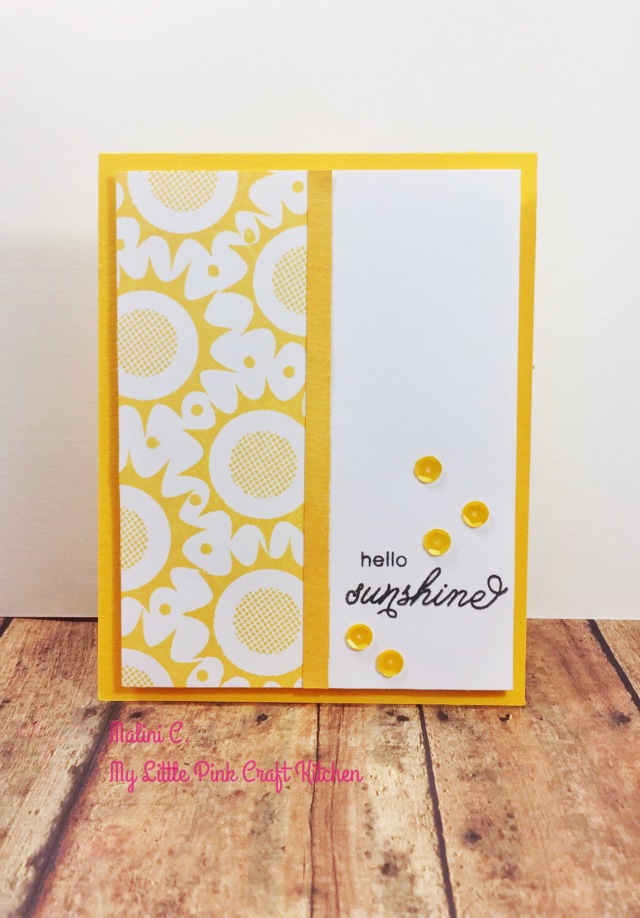
I started this card with panel of Neenah Solar White card stock. I masked the left side and repeatedly stamped the sun image from the Color and Sunshine stamp set using Butter Bar ink from Hero Arts. For the centers of the sun, I used a circle stamp from Love This with the same Butter Bar ink. For some separation, I used the Butter Bar ink and applied it directly to the paper so I could cut a strip with the same yellow shade as my stamping. I cut the colored strip to 1/4 inch and attached it to the card.

For the sentiment, I used a greeting from the Color and Sunshine set and stamped it with Versafine Onyx Black ink and heat embossed it with clear embossing powder.

To finish the card, I adhered some Marigold sequins from Pretty Pink Posh with the Ranger Multi Matte medium liquid glue. I attached the panel to the card base made from Simon Says Stamp Sunshine card stock.

That’s it for this card. For a complete list of the all the tools and products I used, please check the supply list below.

SUPPLY LIST:

  1. Neenah Solar White card stock
  2. Simon Says Stamp Sunshine card stock
  3. Simon Says Stamp Color and Sushine
  4. Simon Says Stamp Love This
  5. Hero Arts ink in Butter Bar
  6. Versafine Onyx Black ink
  7. American Crafts Zing Clear Embossing Powder
  8. Pretty Pink Posh Marigold sequins
  9. Scotch Foam Tape
  10. Elmer’s Glue Dot Runner
  11. Ranger Multi Matte Medium Liquid Glue

Spread Your Wings

Hi everyone! I’m here with a card that I will be entering into a few challenges.

Here is my card

I started this card with Canson XL Student Grade watercolor paper. I decided to use the mini distress ink pad from Tim Holtz and just swipe it on the paper. To soften the lines, I went over it with a damp paintbrush.

For the sentiment, I used a Ranger wood stamp with Versafine Onyx black ink. I used the same ink with the Stampabilities butterfly stamp. I heat embossed the sentiment and image with clear embossing powder.

To finish the card, I adhered some Sparkling Clear sequins from Pretty Pink Posh.

I am entering this card for the following challenges:

CAS(E) This Sketch – Challenge #228

AAA Cards – Words Take Centre Stage / Words Have Power

CAS-ual Fridays Challenge – TicTacToe (Butterflies-One Layer Card-Stripes)

Addicted to Stamps and More – Clean and Simple card

For a list of the tools and supplies used, please check below.

  1. Canson XL Student Grade watercolor paper
  2. Tim Holtz Distress ink – Abandoned Coral, Fossilized Amber, Salty Ocean
  3. Ranger/Dylusions Wood Stamp – Wings Quote
  4. Stampabilities Wood Stamp – Tiny Butterfly
  5. Versafine Onyx black ink
  6. American Crafts Zing Clear Embossing powder
  7. Pretty Pink Posh Sparkling Clear sequins
  8. Ranger Multi- Matter medium.

Thats it for this card. Thank you for reading.

To My Mama Bear – Happy Birthday

My mom and I always joke around calling each other Baby Bear and Mama Bear. So even if my mom’s birthday is still far away, I jumped on the chance to make this card using the Lil Hoot set from Hero Arts.

I am entering this card for the A Blog Named Hero Interactive Card Challenge sponsored by Chibitronics. Chibitronics is not required for this challenge but the card had to be interactive. So after a lot of thought on what kind of interactive card I wanted to make, I settled on a spinner card.

Here is my card —

I started this card with a the Neenah Textured card stock in blue and stamped the Hero Arts Magical Background using Versamark ink and embossed in American Crafts Zing Clear Embossing powder. I wanted it to haver stitched edges but I didn’t have a big enough die, so I used the straight line die cute from Pretty Pink Posh on each side. I cut the circle on both the panel and card base at the same time. For the image, since the bear from Lil Hoot wasn’t symmetrical, I had to do mirror image stamping to get the the back side of the image for the spinner.

For the sentiment, I used one of the smaller dies from the My Favorite Things Stitched Rectangles Stax. I used Milo’s ABC from Lawn Fawn to create the mama bear sentiment and a happy birthday sentiment from the It’s Your Day set from Hero Arts.

Here is a short clip of the spinner card in action —

For information on the tools and products used, here is the supply list

SUPPLY LIST:

  1. Neenah Solar White Card stock
  2. Neenah Light Blue Textured card stock
  3. Hero Arts Magical Background
  4. Hero Arts Lil Hoot
  5. Hero Arts It’s Your Day
  6. Lawn Fawn Milo’s ABC’s
  7. My Favorite Things Stitched Rectangle Stax
  8. Sizzix ThinLits Circle Die
  9. Pretty Pink Posh Stitched Borders 2
  10. Versafine Onyx Black ink
  11. Versamark ink
  12. American Crafts Zing Clear Embossing Powder
  13. Prismacolors Colored Pencils
  14. Masterpiece Odorless Mineral Spirit
  15. The Paper Studio Paper Blending Stump
  16. Be Creative Double Sided Tape
  17. Coats Grey Thread

That’s it for this card. Thanks for stopping by.

Happy You’re My Friend

Hi everyone! Im here with another card I am entering for a couple challenges. I will link the challenges below.

Here is my card —

I started this card with a panel of Neenah Solar White card stock and I stamped flowers in coral and aqua inks. Then I accented the centers and blank spaces with grey ink. I cut the stamped panel to 4 x 5 1/4 and then used a curved border die to cut the panel on a curve.

On a standard size card base, I attached a grey striped paper from My Mind’s Eye. I curved the sentiment to match the curve of the panel and stamped it with Versamark and embossed it with a silver embossing powder. To finish the card, I attached the curved panel with foam adhesive.

I am entering this card to the following challenges –

CAS-ual Fridays – Color Challenge

Simon Says Stamp Wednesday Challenge – use patterned paper

For information on the tools and products I used, please refer to the supply list below –

SUPPLY LIST

  1. Neenah Solar White Card stock
  2. My Mind’s Eye Chalk Studio Collection 6×6 paper pad
  3. Simon Says Stamp Flowers On My Mind stamp set
  4. Hero Arts Shadow Inks  – Fresh Peach and Soft Granite
  5. Simon Says Stamp Ink – Audrey Blue
  6. Versamark ink
  7. American Crafts Zing Silver Embossing Powder
  8. Pretty Pink Posh Stitched Borders 1
  9. Elmer’s Glue Dot Runner
  10. Scotch Foam Tape

That’s it for this card. Thank you for reading.

Thanks For Being There

Hi everyone! I’m here with a new card for a few challenge blogs. I will link and mention these challenges at the end of the post.

If you read my previous post about starting to make cards again, I promised myself that I will not buy anything new until I can follow through cardmaking for at least a month. So for this card, I used stamps from Lawn Fawn and Simon Says Stamp that are oldies but goodies.

Here is my card —

I started this card with Neenah Solar White cardstock and stamped the images from Lawn Fawn’s Critters in the Forest using Versafine Onyx Black Ink. To color the images, I used Prismacolor pencils and blended the different colors with an odorless mineral spirit and a paper stump. I blended some Surf Blue ink from Simon Says Stamp around the image to give it some depth. I used the Stitched Borders 2 from Pretty Pink Posh to cut the panel diagonally.

For the card base, I used a standard size Neenah Solar White cardstock. I adhered the sequins patterned paper from Doodlebug and Simple Stories from an old SSS Card Kit.

For the sentiment, I die cut the thanks die from a textured gray card stock (I don’t know the exact name) from Neenah. I layered 4 pieces to get some dimension and from the matching stamp set, I stamped a sentiment on a thin strip with Versamark ink and embossed it with the American Crafts Zing white embossing powder.

I am entering this card for the following challenges –

Simon Says Stamp Wednesday Challenge – use patterned paper


Freshly Made Sketches – Sketch #293 

The Paper Players Challenge – using our Feathered Friends

For information on the the tools and products I used for this card, please check the supply list below:

SUPPY LIST:

  1. Neenah Solar White card stock
  2. Neenah Textured card stock – gray
  3. Doodlebug/Simple Stories 6×6 patterned paper
  4. Lawn Fawn Critters in the Forest
  5. Simon Says Stamp Thanks stamp set and coordinating die
  6. Versafine Onyx Black ink
  7. Simon Says Stamp Surf Blue ink
  8. Versamark ink
  9. American Crafts Zing white embossing powder
  10. Prismacolor coloring pencils
  11. Masterpiece Odorless Mineral Spirit
  12. The Paper Studio paper stump
  13. Post it paper for masking
  14. Elmer’s Glue Dot Runner
  15. Scotch Foam tape
  16. Ranger Multi Matte Medium glue

That’s it for this card. Thank you for reading. See you in my my next post.


Live In The Sunshine

Color-of-Fun-638x300-Blog-Hop

Hi everyone! I’m here today with a card with a product from The Color of Fun release by Simon Says Stamp. I was lucky enough to receive a product early to make cards with and let me tell you this release is awesome.

I got the One With Nature stamp set and I have already made 4 cards which I will share everyday this week. I was quite skeptical about this set, but if you really look beneath the stamp, you will see endless possibilities.

Here is my card —

Live In the Sunshine

I wanted to make a frame using one of the leaves in the stamp and this was what came from it. I knew I wanted to color and as much as I want to be amazing using Copics, I really have not mastered it. I definitely need practice (the first couple attempts of this card will show you). So I decided  to try something I’ve never used before – color pencils. I have a 12 piece Prismacolor set that I have never used and I decided to try it. To my surprise, I found it very easy and and awesome. I used two kinds of green pencils and the shading was effortless.

After, coloring my frame, I was stuck for a couple hours not knowing where and how to put my sentiment. Then eventually it hit me to make a shaker panel with the frame I just made.  I stamped the sentiment on a separate piece of paper and put it inside the shaker panel. For the sequins, I used Sparkling Clear and Mossy Green from Pretty Pink Posh.

That’s it for this card. Thanks for reading

For a complete list of the tools and products I used, please check the supply list below.

I’ll be back tomorrow with another card using this stamp set.

SUPPLY LIST: 

Love, Laugh, Smile

Hi everyone. I’m here today with a card for the Pretty Pink Posh Watercolor Bloghop.

watercolor.bloghop

I have yet to be successful coloring an image with watercolor or do some no line coloring, so I decided to do something I am sure I know how to do – create a background with watercolors.

Here is my card —

IMG_6247

I also made a video with the steps I used to create this card. You can watch it below or on YouTube.


That’s it for this card. Thank you for reading.


Happy Birthday! – Get Sketchy Challenge with Joni

Hi everyone. I’m here with a card for the Get Sketchy Challenge with Joni.

JoniSketch1

I love this sketch and I love Joni’s work so I was inspired to join this challenge.

Here is my card –

IMG_6187


I also made a video where you can watch the process of me making my card. You can watch it here or on YouTube

The supply list will be up shortly.

Thanks for reading!

SUPPLY LIST:


You Are My Sunshine

This is my second post for the day. To check out my first post, click here

My second card for the day is also for the CASology Challenge. I am using the same CUE CARD which is MUSIC. This was the first card I made, so I decided to share and enter it as well.

Week 146 - Music

Here is my card —

You Are My Sunshine

I started this card with some Neenah Solar white card stock and I die cut the largest stitched rectangle from My Favorite Things. I stamped the sentiment using Lawn Fawn’s Milo’s ABC and Simon Says Stamp Color and Sunshine using Versafine Onyx Black ink and Hero Arts shadow ink in Butter Bar. For the sun, I die cut a sun from the You & Me set from Sizzix with a paper from the Doodlebug Lemonade Stand 6×6 paper pack.

I adhered the panel on a piece of Simon Says Stamp Sunshine cards stock that is a standard size top folding card. To finish the card, I used some Pretty Pink Posh sequins. I also covered the sun with some clear Wink of Stella pen and covered with with Glossy Accents.

That’s it for this card. For a complete list of the all the products and tools I used, check out the supply list below.

Thanks for reading.

SUPPLY LIST:

I Only Have Eyes For You

Hi everyone!

Today I’m sharing a card for the Create A Smile March Guest Designer Call.

Guest Designer Call

The guest call will run until February 13 so if you’re interested, go and check it out here.

For this card, I decided to use one of the freebies they have on their website. Here is my card —

IMG_5084

Recently I have been enjoying using digital stamps. I used a Newton’s Nook freebie and I purchased some from Gerda Steiner and now I’m using another freebie from Create A Smile. I will always love clear stamps and I will never stop using them, but digi’s are pretty cool to use once in a while.

I started this card with a panel of Neenah Solar White card stock that measures 5 x 3 3/4 inches. I wanted to color some embossing paste so I used Audrey Blue and Doll Pink from Simon Says Stamp to color some white embossing paste from Wendy Vecchi. I used a chevron stencil from Heidi Swapp and did alternate colors of the paste.

For the focal panel, I cut the image from the Lawn Fawn Stitched Journaling card but I wanted the top to have a straight edge but still keep the stitched detail – so I used the straight border die from the Stitched Borders 2 from Pretty Pink Posh to cut the top part.

I colored the bird with some Copic markers. I will mention the colors in the supply list below. For the sentiment, I was struck with the bird’s big eyes so I wanted to use a puny sentiment related to that. I stamped the sentiment from the Only Have Eyes for you set from Simon Says Stamp with Versafine Onyx black ink and embossed it with clear embossing powder.

To finish the card, I adhered the stitched panel to the chevron piece and I adhered the chevron panel to a standard size card from Neenah Solar White. I also added  Glossy Accents to the eyes of the bird and his stomach. I used enamel dots from My Mind’s Eye to tie in all the colors together.

That’s it for this card.

For a complete list of all the products and tools I used, please check the supply list below.

Thanks for reading.

SUPPLY LIST