12 Days of Chrimstas Cards Day 6 – Season’s Tweetings

Hi everyone! Welcome to Day 6 of my 12 Days of Christmas Cards. Before we begin, I just wanted to remind you that I have a giveaway happening on my blog at the moment. For all the details on how you can enter, check out this post. 

For day 6, I wanted to do a shaker card using Lawn Fawn and Pretty Pink Posh products. It was challenging and there was a little bit of pressure doing it on camera, but I liked the end result.

Here is my card –

Seasons Tweetings

I created a video showing the process in which I created the card. You can watch it below or on YouTube.


For a complete list of the tools and products I used, check out the supply list below.

This card is an entry for the Lawnscaping Challenge – Merry Christmas.

96

That’s it for this card. Thanks for watching and reading. See you soon for Day 7.

SUPPLY LIST:

12 Days of Christmas Cards Day 5 – I’ll Be Home For Christmas

12 Days of Christmas


Hi everyone! Welcome to Day 6 of my 12 Days of Christmas Cards. Before we begin, I just wanted to remind you that I have a giveaway happening on my blog at the moment. For all the details on how you can enter, check out this post. 

For day 6, I wanted to do a missing you/I’ll see you soon at Christmas card. So using stamps from Hero Arts and Sweet Stamp Shop, I made a holiday town scene.

Here is my card —

ill Be Home for Xmas

I created a video showing the process in which I created the card. You can watch it below or on YouTube.

For a complete list of the tools and products I used, check out the supply list below.

That’s it for this card. Thanks for watching and reading. See you soon for Day 6.

SUPPLY LIST: 

Love You Tons

Hi everyone! This card is an entry for CAS(E) This Sketch challenge.

Here is the sketch for this week

CTS_87

This week, they joined forces with Tag You’re It. So this weeks challenge needs to either be a tag or have a tag incorporated to the finished project.

TYIC_Badge

Here is my card —

Love You Tons

I started this card with some Neenah Solar White card stock cut to a standard size card with the fold on top. I colored some Wendy Vecchi embossing paste with Simon Says Stamp ink in Cotton Candy. I placed the chevron stencil from The Crafter’s Workshop on the card base and masked off the right side. Just like the sketch, I only wanted the texture on the left side. After spreading the paste and letting it dry, I started with my tag element. I recently got the Lawn Fawn Love You Tons set which was a surprise gift from my sister (she loves surprising me with crafty things that make happy). I stamped the elephants and colored them in with the Grey and Pink sets from Spectrum Noir. I stamped the tag from LF’s Tag You’re It from a piece of paper from Pink Paislee with VersaMark and heat embossed it with silver embossing powder from American Crafts. I die cut the tag using the coordinating die and attached the elephants. I stamped the hearts from the Happy Thoughts set from Simon Says Stamp in Lipstick Red ink. I attached the tag to the card and added some pink twine.

For the sentiment, I cut a strip of Neenah Solar White and stamped the sentiment from the Love You Tons set with VersaMark and heat embossed it with the same silver embossing powder. I wanted it to be more than a banner, so I cut one side of the sentiment strip like a regular banner and I cut the other side at a diagonal for added interest. I added it with foam squares to the bottom of the card.

To finish the card, I accented the elephants and hearts with the Clear Wink of Stella glitter brush pen and added some sequins from Pretty Pink Posh.

That’s it for this card.

For a complete list of all the product and tools I used, please check the supply list below.

Thanks for reading. I will be back soon with more cards from the ongoing class at Online Card Classes.

SUPPLY LIST:

Online Card Class Days 1 and 2 – Background Stamps

SYS2_participant

Hi everyone! I’m here today with some homework for Online Card Classes. I have been a little off the radar ever since class started and I just recently watched the first few days of class. For this post, I have 3 cards I made for Days 1 and 2. I didn’t have any of the stamps they suggested but I shopped my stash and found 2 woodblock stamps from Stampabilities that I purchased from Hobby Lobby. I decided to use both those stamps – one was a quatrefoile stamp that is great for coloring like Kristina’s technique and the other which is the tapestry stamp which is perfect as a reverse background stamp.

Here are my cards —

CARD #1

Thanks Watercolor

I started this card with some Bazzill card stock in Licorice Twist cut to a 4 Bar card with the fold on top. For the panel, I used some Strathmore watercolor paper. I stamped the Quatrefoile background with VersaMark and embossed the image with some AC Zing white embossing powder. I decided to try the water coloring technique that Kristina shared. I colored the spaces with watercolor in a rainbow order but vertically.

For the sentiment, I die cut the Thanks die from SSS at the center of the watercolor panel and also from some Licorice Twist card stock. I inlaid the black thanks on the watercolor panel. To finish the card, I attached the panel on the card base with foam tape and added some black enamel dots from My Mind’s Eye.

CARD #2

You're Very Strong


I started this card with some Bazzill Licorice Twist card stock cut to a 4 Bar card. I also used the same color for the front panel. I stamped the Stampabilities Tapestry stamp. I stamped the image on the panel with some Versamark ink and before it could dry I brushed on some Perfect Pearls powder in bubblegum. This was the technique that Jennifer Mcguire taught and I just fell in love with it. After the finished brushing the powder, I misted some water and heat set the panel to dry.

For the sentiment, I cut a circle using the smallest shape in the Sizzix Circle Framelits set. I traced the placement of the circle, and stamped a sentiment from the Simon Says Stamp Love This set in VersaMark. Then I heat embossed it with AC Zing Silver Metallic embossing powder. To finish the card, I adhered the front panel to the base with some foam tape.

CARD #3

XOXO Hugs and Kisses Emboss Resist

I started this card with some Neenah Solar White card stock cut to a 4 Bar card. For the front panel, I used some Strathmore water color paper. I stamped the Quatrefoile stamp with VersaMark and heat embossed it with some AC Zing White Embossing powder. I sponged on Distress Inks  with different shades of blue. I started with Broken China at the bottom, then Peacock Feathers in the middle and Tumbled Glass on top. While I was adding each color, I made sure to blend them together. To give it a water color look, I spritzed the panel with water and left it to dry. I love splotches it created.

For the sentiment, I used the Hero Year Round Greetings. I stamped the message on Neenah Solar White card stock cut to a small frame using the Sizzix Framelits Borders. I stamped it with black pigment ink and heat embossed it with some AC Zing Clear embossing powder. I looped some black twine at the center of the panel and adhered my border sentiment on top. To finish the card, I attached the panel to the base and adhered some sequins from Pretty Pink Posh.

That’s it for the first 2 days of class. I’m quite behind with the lessons so it will take a while for me to catch up with all the lessons. But I will definitely be back with cards for days 3 and 4 very soon.

For a list of tools and products I used, please check the supply list below.

Thanks for reading.

SUPPLY LIST :

CAS(E) This Sketch Challenge – Sending Happy Mail

Hi everyone! I’m here with a card using supplies from the Simon Says Stamp July 2014 Card Kit. This card will be an entry for the CAS(E) This Sketch Challenge #83. Here is the sketch —

CTS_Sketch83


Instead of using the flowers and the banner sentiment, I decided to use envelopes and a bigger sentiment. Here is my card —

Sending Happy Mail

I started this card with some Taffy card stock from Bazzill cut to a standard size landscape card. I used the envelopes from the Sending Happy Thoughts set and stamped it on different pieces of patterned paper from Pink Paislee that is included in the kit. After cutting the envelopes, I lined the edges with a black marker and arranged it horizontally towards the top of the card in a staggered form. I adhered some of them with a Zig glue pen straight on to the card and the others using foam squares for added dimension.

For the sentiment, I used the sentiment stamps for the same set and stamped it in Delicata Golden Glitz ink. I love the combination of the Taffy card stock with the gold ink. The picture doesn’t do it justice but it is very sparkly in person.

To finish the card, I accented the envelopes with some Wink of Stella clear glitter brush and I also rounded the bottom corners.

For a complete list of supplies and tools that I used, please check the link-up tool below.

That’s it for this card. Thanks for reading.


Wednesday Card Day – On Your Special Day

Wednesday Card Day Intro

Hi everyone! I’m here today with a card using the supplies from the Simon Says Stamp May 2014 Card Kit. Now I’m going to be honest but I had a very difficult time thinking of cards that I wanted to make with this kit. Maybe my lack of experience in making masculine cards was the culprit. But I finally came up with something simple. I will try and make more with this kit to try and stretch my creativity.

Here is my card —

On Your Special Day


I started this card with Neenah Solar White card stock cut to a standard size card. I covered the entire front panel with the tweed/chevron patterned paper from the Be Different collection from Fancy Pants included in the kit. For the image and sentiment panel, I cut some Neenah Solar White card stock to 4 1/2 by 3 3/4. On the panel, I adhered 2 of the sneaker images from the SSS All Boy stamp set included in the kit. One was colored blue and the pink. I colored the images using Bic Mark It markers and I accented some parts with some Wink of Stella clear glitter pen. For the sentiment, I used the Card Phrases set from Stampabilities. I cut the stamp so it would fit on the front. I stamped the first and last part of the sentiment with Staz-On Jet Black ink and the I stamped the scripted sentiment with SSS Lipstick Red ink. To finish the card, I added a heart in between the 2 sneakers to make it look like a wedding themed card. I accented the heart with Elmer’s red glitter glue. I also rounded the corners of the front panel for added interest.

That’s it for this card. You can watch the video process here below or on YouTube


SUPPLY LIST:

1. Neenah Solar White card stock
2. Simon Says Stamp May 2014 Card Kit (patterned paper and stamp set)
3. Memento Tuxedo Black ink
4. Staz On Jet Black ink
5. Bic Mark It Markers
6. Elmer’s Glitter Glue
7. Stampabilities Card Phrases stamp set
8. SSS Lipstick Red ink

I Love You Watts and Watts – SSS April 2014 Card Kit

Hi everyone! Today I’m here with a card using the supplies from the Simon Says Stamp April 2014 Card Kit. This kit is packed with amazing things. The stamp set has a light bulb image and many matching sentiments. The papers from Simple Stories are also very bold and pretty.

You can purchase the kit on its own for 24.95 or be a card kit subscriber and pay 19.95 per month for each kit.

I wanted to enter this card for the Retro Sketches Challenge Blog but I was a couple of days late. I still decided to continue making the card because I thought it was a pretty unique sketch.  Here is the sketch from the challenge that I used —

rs110


Here is my card —

I Love You Watts and Watts


I started the card by trying to make a template with triangles. I really didn’t have a formula but I just drew diagonal lines and I ended up with 4 triangles. The second and bottom one were 1 1/2 inches wide and I used that for my patterned paper. I chose 2 floral papers from the Simple Stories and cut and adhered them. For the center triangle, I knew I wanted to stamp something. I used the light bulb stamp and the coordinating shadow stamp. I used Hero Arts Lemon Yellow for the shadow and Memento Tuxedo Black ink for the bulb. Then I decided to create a pattern of light bulbs just using the bulb image without the shadow to leave that one image as the focal point.

For the sentiment, I used 2 stamps from the set. I mounted them side by side and stamped it on Memento Tuxedo Black ink.

To finish the card, I used some Elmer’s Gold Glitter Glue on the heart and adhered some wood veneer shapes from Freckled Fawn.

You can watch the video below or on YouTube to watch all the specifics on how I made card —


SUPPLY LIST
1. Simon Says Stamp April 2014 Card Kit (patterned paper, stamp set and wood veneers)
2. Hero Arts Shadow Ink in Lemon Yellow
3. Memento Tuxedo Black ink
4. Elmer’s Gold Glitter Glue
5. Glossy Accents 
 

That’s it for this card. Thanks for reading and watching!

Wednesday Card Day – Wishing You Love and Laughter

Hi everyone!

Wednesday Card Day Intro


Today’s card is an inspiration I got from a card shared by Christina Kowalczyk from My Paper Secret at the Clean and Simple Online Card Class – One Layer Cards. She did the same sharp color blocking technique but used embossing powder instead. I was inspired by that and decided to use a stamp rather than embossing powder.

Here is my card —

Wishing You Love and Laughter

On a standard size card, I masked off an area at the center to fit my sentiment. Then around it, with 5/8 inch strips of masking paper, I started creating my blocked abstract pattern. I used the swirly stamp from Simon Says Stamp Life is a Journey set. That set is one of my favorites from SSS. I stamped the swirl image in each blocked area with different inks. (See supply list below with all the colors I used)

For the sentiment, I used the Truly Appreciated set from Hero Arts. I stamped the sentiment with Memento Tuxedo Black ink.

You can watch the video below to watch all the specifics on how I made card —


SUPPLY LIST:
1. Neenah Solar White card stock
2. Inkadinkado stamping masking paper
3. Simon Says Stamp – Life is a Journey stamp (swirl)
4. Hero Arts – Truly Appreciated stamp (sentiment)
5. Memento Tuxedo Black ink (sentiment)
6. Simon Says Stamp ink – Midnight Green, Island Blue and Lipstick Red
7. Hero Arts shadow ink – Pale Tomato, Butter Bar, Lime Green,        
     Soft Cantaloupe, Passion Flower, Mint Julep, Cornflower Blue,
     Lemon Yellow, Orange Soda and Soft Pool
 

That’s it for this card! Thanks for stopping by.

This is shared for the Work It Wednesday feature over at the Simon Says Stamp blog

Wednesday Card Day – You Make Me Happy When Skies Are Grey

Wednesday Card Day Intro


Hi everyone! Today I’m here with another card for the Simon Says Stamp March Card Kit. This card also uses some great products from Lawn Fawn that aren’t in the kit.

Here is my card —

You Make Me Happy When Skies Are Grey

I started this card with Neenah Solar White card stock cut to a standard size card with the fold on top. I measured and cut the sunshine rays paper from Lawn Fawn’s Hello Sunshine Collection and adhered it to the front of the card. I measured the paper to make sure the rays were at the bottom center as if the rays were shining. I then used the Lawn Fawn Speech Bubble border die using the grey polka dot paper from the same collection to place on top. For the sentiment, I used the orange alphabet stickers from Kelly Purkey included in the kit. I saw this sentiment on Pinterest and knew that it would work well with the card. For the image, I stamped the own and log from Lawn Fawn’s Critters in the Forest set with Memento Tuxedo Black ink and then colored it with alcohol markers. I have inexpensive markers from Hobby Lobby that I’m using to learn to blend colors. I’m still trying my best and learning how to blend with the help of YT videos but somehow my finished product don’t match up. But practice makes perfect so I will defintely keep practicing.

To finish the card, I stuck the speech bubble and owl image with foam adhesive and added some sequins from Darice that was included in the kit.

SUPPLY LIST
1. Simon Says Stamp March Card Kit (card stock, LF Hello Sunshine patterned paper, Kelly Purkey orange stickers, White                          Iridescent Sequins
2. Lawn Fawn Speech Bubble border die
3. Lawn Fawn Critters in Forest stamp set
4. Hobby Lobby The Fine Touch markers ( BR101, BR103, BR91, G46, YR23, CG1, CG3, and CG5) 
 

You can watch the video here or on You Tube —


Thanks for watching!

SSS January Kit Card #1 – Happy Valentine’s Day

Hi everyone! Today’s card is my first card for the Simon Says Stamp January Card Kit. This card kit is pure awesome! I love the stamp set included and it coordinates well with the rest of the kit. You can purchase the card kits over at Simon Says Stamp for 24.95, but if you become a card kit member you can get the kit every month for 19.95. Let me tell you — it is totally worth it.

This card is also an entry for the Simon Says Stamp Wednesday Challenge. The theme for this challenge is BLING IT ON!!!

wednesdayblog-logo

wed-newchallenge-header


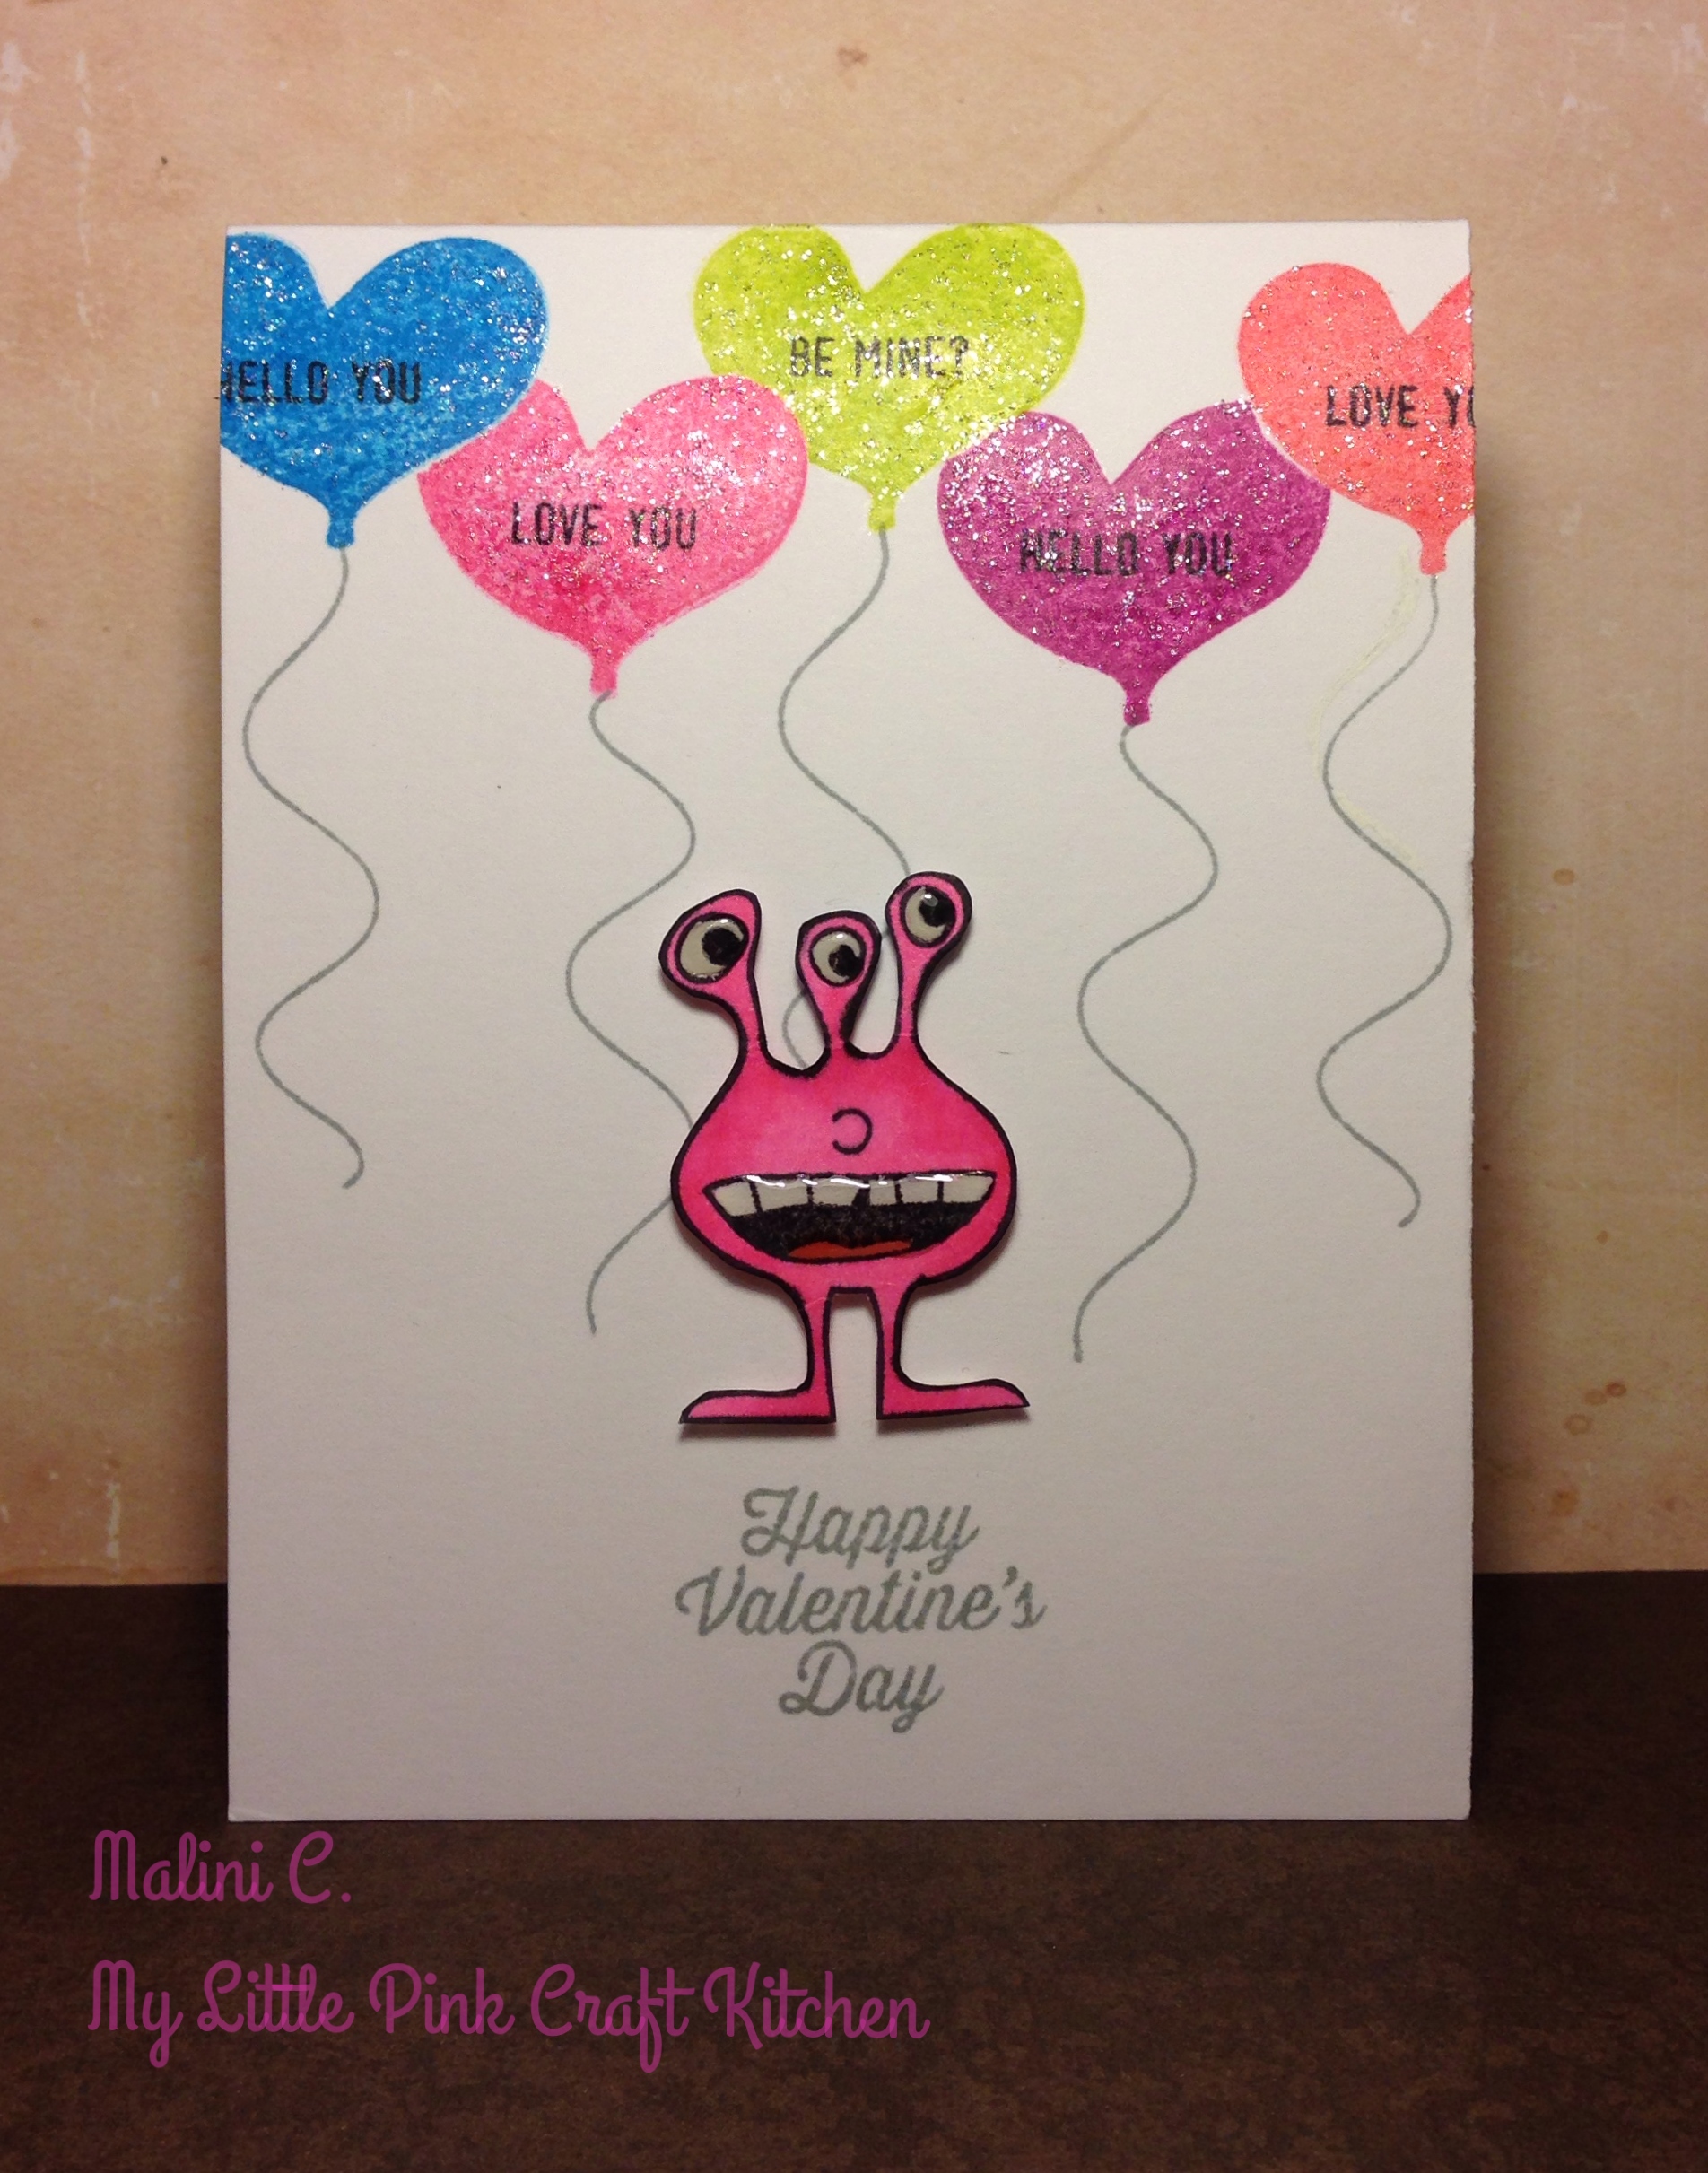
Here is my card — (I’m sorry for the quality of the picture, since it has been raining here for 3 days non stop it was almost impossible to get a decent shot.)

Happy Valentines Day


I started this card with Marshmallow card stock from Bazzil cut to a standard size card with the fold on top. I stamped the heart balloon from the Only Have Eyes For You set that came in the kit towards the top of the card with Memento’s Bahama Blue, Rose Bud, Pear Tart, Lilac Posies and Lady Bug. I stamped it using masking paper to make it look like the balloons were either in front or behind each other. I used the mini sentiments from the same set and stamped with Memento Tuxedo Black randomly inside the balloons. Then I used some clear stickles and painted them on the balloons for some shine. I really like those foil balloons with the greetings printed on them so that was what I was trying to imitate. I stamped the strings also from the same set in Memento’s London Fog.

For the monster, I stamped it on white card stock and used the Chromatix Markers Bubblegum trio from American Crafts. I tried my blending techniques again and even if I’m still not completely satisfied with it, this is the first time I have seen actual shading on the finished image. After coloring, I cut the monster out and placed him at the  center of the card with foam squares.

For the sentiment, I used the Happy Valentine’s sentiment from the same Only Have Eyes For You set in Memento’s London Fog ink. I know that we still will welcome the new year, but I just couldn’t help myself with such an adorable stamp set. 🙂

To finish the card, I put some Glossy Accents on the eyes and mouth of the monster for some dimension.

That’s it for this card. Thanks for reading. Happy New Year! May there be more crafting and card making in 2014!