Holiday Card Workshop Day 1 HW – Owl I Want For Christmas Is You

HCW13_participant


Hey everyone! Today I’m here with a very late card for Day 1 of the Holiday Card Workshop at Online Card Classes.

The lesson for day 1 was the importance of not only the outside of the card, but also the inside. We were challenged to make a card with something on the inside.

Here is the outside of my card –

owl i want front


And here is the inside —

owl I want inside


I’ve always wanted to make a window card and never got it right since I didn’t have a die-cutting machine. Now that I have one, I thought it would be awesome to make a window card.

Let’s get to the card details —

I started card with some Neenah Dessert Storm card stock cut to a standard size card with the fold on top. To make the window, I used the the 4th smallest circle from the Sizzix Framelits cirlce die set. To make the frame, I used the a slightly larger scallop die from the Sizzix Framelits Cirlce Scallop die set. I cut the frame using patterned paper from the Noel collection from American Crafts. I also used a strip of the same patterned paper at the bottom.

For the inside of the card, I lined the entire panel with a snowflake printed pattern paper from the same Noel Collection from American Crafts. I stamped the owl from Lawn Fawn’s Winter Owl and the tree log from Lawn Fawn’s Critters in the Forest in Memento Tuxedo Black ink. I used the AC Chromatix markers to try (the operative word is try) to color and blend. I really want to learn how to blend alcohol markers and I really don’t think I’m any good. I will keep practicing until I get better. I paper pieced another patterned paper from the Noel collection to be the owl’s scarf. I placed both images on the inside of the card to align with the window so the image can be seen when the card is open or closed. For the sentiment, I used the sentiment the Winter Owl set and selectively stamped with Cottage Ivy and Rhubarb Stalk inks from Memento. I stamped it on the Sizzix scallop oval from the Sizzix and Doodlebug Borders set. I braided Lawn Fawn’s Peppermint twine and adhered the sentiment panel on top. To finish the card, I distressed the scallop oval with some Tim Holtz Vintage Photo distress ink and rounded the corners.

That’s it for this card. Thanks for reading.

Always Be Strong

Hey everyone! Today’s card is an entry for the 10 Minute Craft Dash over at Paulina’s blog – Pretty Pink Posh.

CD_29


Normally there is a color palette to follow, but this time the card needed to incorporate buttons in some way. So here is my card —

Always Be Strong


It took me 8 minutes and 37 seconds to finish this card.

I started this card with some Natural card stock from Neenah cut to a landscape standard size card. I cut out the heart image from a 12×12 sheet from ColorBok’s Sweet Memories collection. I used some maroon ribbon and attached it to the hearts. I also accented each heart with buttons. I attached the hearts to look like they were hanging from somewhere.

For the sentiment, I used the Be set from Simon Says Stamp. For that set, you can mix and match sentiments and I picked “Always Be Strong”. I stamped the first and last line of the sentiment with some Rich Cocoa ink and for the “be” part, I used Rose Bud both from Memento.

To finish the card, I embellished with some matching sequins for added interest.

SUPPLY LIST:
1. Natural cardstock from Neenah
2. 12×12 sheet from ColorBok’s Sweet Memories collection.
3. buttons and ribbon from Walmart
4. Simon Says Stamp Be sentiments
5. Memento inks in Rich Cocoa and Rose Bud. 
6. assorted sequins


That’s it for today. Thanks for reading.


SSS October Kit Card #5 – You’re So Tweet

*** This is my fifth and last card for the Simon Says Stamp October Kit. I will move on to the November Kit and cards from the Holiday Card Workshop. Sorry real life took over and October was just hectic and crazy and blogging took a backseat. After this post, I am now back on track with 3 card posts a week. Thanks for understanding. 

Hey everyone! Today I made a card using the supplies from the Simon Says Stamp October card kit.

Here is my card –

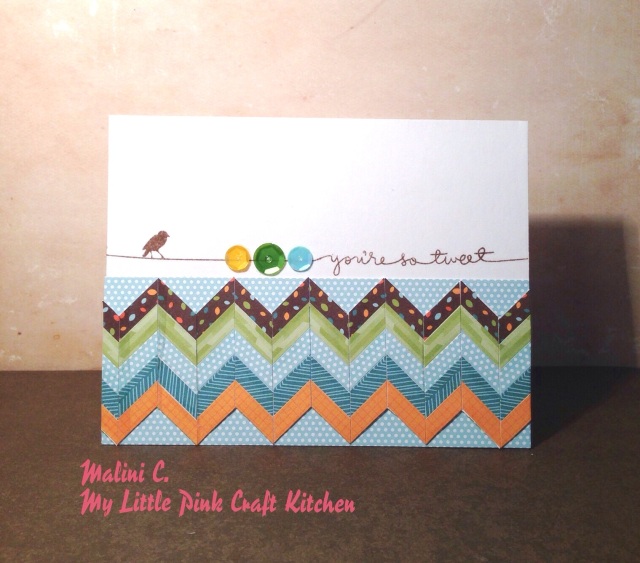
You're So Tweet

I started this card with some Bazzill Marshmallow card stock cut to a landscape standard size card. I used a technique that Jennifer McGuire demonstrated in this video. Ever since I learned about this technique, I have used it non-stop since I am in love with chevrons. I used different patterns from Lawn Fawn’s Into the Woods collection and adhered the finished chevron panel at the bottom of the card. For added interest, I adhered 2 panels on patterned paper on top and at the bottom of the chevron piece.

For the greeting, I used the sentiment stamp from the set included with Memento Rich Cocoa ink. I also stamped the bird to match the sentiment with the same Memento ink. To finish the card, I embellished with matching sequins from LF’s Into the Woods collection.

That’s it for today. Thanks for reading. I will be back soon with cards from the November kit and the ongoing Holiday Card Workshop.

SSS October Kit Card #4 – Nuts About You

*** This is my fourth card for the Simon Says Stamp October Kit and I have one more coming later today and then I will move on to the November kit and cards from the Holiday Card Workshop. I honestly planned to make 4 cards but I had to make one more as the kit was just so awesome. Sorry real life took over and October was just hectic and crazy. 

Hey everyone! Today I made a card using the supplies from the Simon Says Stamp October card kit.

Here is my card –

Nuts About You


I started this card with the Aqua cardstock that comes in the kit. I cut and scored this card to a 4 1/4 square card. I’ve rarely used this card size, but I am enjoying it a lot and will definitely use this size more often.

For the bottom border, I used the “Nuts About  You” sentiment and the nut included in the set and I stamped it repeatedly with some Hero Arts Soft Pool shadow ink. Then on a 2×2 panel of some Bazzill Marshmallow card stock, I stamped the squirel, the nut and the sentiment using the same Hero Arts Soft Pool ink. I made a 2 1/4 square base for the white panel with one pattern paper from Lawn Fawn’s Into the Woods collection. For added interest, I used a strip of another paper from the same collection and adhered it at the top. To finish the card, I added some of the blue and white sequins for a very monochromatic look.

That’s it for today. I will be back with my last card for the SSS October Kit.

Thanks for reading 🙂

SSS October Kit Card #3 – Happy Birthday

*** This is my third card for the Simon Says Stamp October Kit and I have one more coming tomorrow and then I will move on to the November kit. Sorry real life took over and October was just hectic and crazy. 

Hey everyone! Today I made a card using the supplies from the Simon Says Stamp October card kit.

Here is my card —

Happy Birthday Flag Banners


I started this card with the aqua card stock included in the kit. I cut and scored it to a standard size landscape card. Using some of the awesome Lawn Fawn papers, I used my Cuttlebug and cut some flags and pennants using the Sizzix Framelits Banner set. I arranged the banners and flags diagonally adhered it with some foam adhesives. Then I punched a hole in each one and threaded the twine from May Arts on each of the holes and secured the tails at the back with some tape. For the sentiment, I used the Kelly Purkey Teal Alpha stickers and spelled Happy Birthday. To finish the card, I used an assortment of sequins from Lawn Fawn’s Into the Woods collection to embellish the card.

Thats it for today. I will be back with my last card for the October kit.

SSS October Kit Card #2 – Giving Thanks

*** This is my second card for the October Kit and have a few lined-up, so it will spill over until the first few days of November and then I will move on to the November kit. Sorry real life took over and October was just hectic and crazy. 

Hey everyone! Today’s card is an entry for the Simon Says Stamp Wednesday Challenge.

wednesdayblog-logo


wed-newchallenge-header


The theme for the challenge this week is —- ANYTHING GOES! 🙂


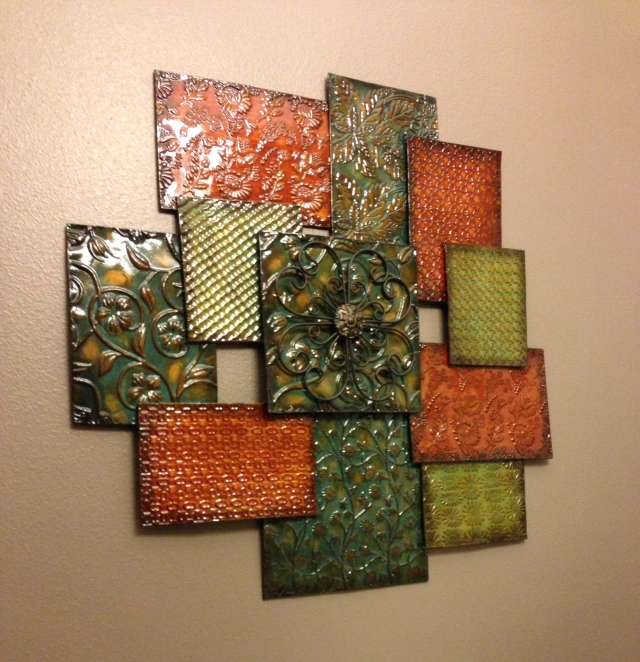
I got the inspiration for this card from this wall piece in my sisters house

wall inspiration


So here is my card —

Giving Thanks


I started this card with some Neenah Desert Storm card stock cut to a standard size portrait card. To that, I adhered different pieces of patterned paper from Lawn Fawn’s Into the Woods collection. I cut the paper to different sizes and placed it in different places for more interest. Then a piece on watercolor paper, I stamped the branch and sentiment in Memento’s Rich Cocoa ink. Because I knew that I would be using distress markers for the leaves, I decided to spritz the dye ink with some water to give it a watercolor look. For the leaves, I decided to use markers versus the distress inks so I could have different colored leaves. The distress markers I used were Crushed Olive, Forest Moss, Wild Honey, and Vintage Photo. Like branch and sentiment, before stamping I lightly spritzed the inked stamp with water for a watercolor look. To finish the card, I rounded the corners of the watercolor panel and adhered it with foam adhesives at the center.

That’s it for today. Thanks for reading. 🙂