Happy Birthday!

Hi everyone! I’m here today with a card using a couple of sketches from 2 different challenges. I know it’s ironic that I decided to combine two sketch challenges because realistically it would just be a mess. But both sketches I used are very similar.

This card is an entry for the CAS(E) This Sketch Challenge. This is the sketch —

CTS_105


And this is sketch for the My Favorite Things sketch challenge.

210

So when you look at both sketches, they are very similar. A frame/panel, a focal point on the left and the sentiment next to it. The only difference is the orientation. So I may be crazy but I decided to incorporate both sketches and make it my own.

Here is my card —

Happy Birthday Doggie


I started this card with some Carnation layering paper from Hero Arts cut to a landscape card with the fold on top. I used the star backdrop from Lawn Fawn’s Teeny Tiny Backdrops. I wanted to stamp the background and have a tone on tone effect, so I used Cotton Candy ink from Simon Says Stamp. For the frame, I used the two biggest rectangles from the My Favorite Things Stitched Rectangle dies. I cut a frame from some gold paper from the Glitzy Glitter paper pack from Die Cuts With A View.

For the focal image, I stamped the dog from the Cupcake Cutie set from My Favorite Things and colored it in with Copic markers. I will have all the colors in the supply list below. I cut the image with a circle punch and I cut another balloon and adhered it with foam adhesive. I also added some clear Wink of Stella to the balloon and the ribbon on the dog. Then I added Glossy Accents to the balloon. For the sentiment, I stamped the birthday greeting from the same Cupcake Cutie set on a strip of Carnation layering paper with Versamark and heat embossed it with gold embossing powder.

To finish the card, I placed some gold and pink enamel dots from My Mind’s Eye.

That’s it for this card. For a complete list of the supplies I used, please check the supply list below.

Thank for reading! See you soon.

SUPPLY LIST:


12 Days of Chrimstas Cards Day 6 – Season’s Tweetings

Hi everyone! Welcome to Day 6 of my 12 Days of Christmas Cards. Before we begin, I just wanted to remind you that I have a giveaway happening on my blog at the moment. For all the details on how you can enter, check out this post. 

For day 6, I wanted to do a shaker card using Lawn Fawn and Pretty Pink Posh products. It was challenging and there was a little bit of pressure doing it on camera, but I liked the end result.

Here is my card –

Seasons Tweetings

I created a video showing the process in which I created the card. You can watch it below or on YouTube.


For a complete list of the tools and products I used, check out the supply list below.

This card is an entry for the Lawnscaping Challenge – Merry Christmas.

96

That’s it for this card. Thanks for watching and reading. See you soon for Day 7.

SUPPLY LIST:

12 Days of Christmas Cards Day 5 – I’ll Be Home For Christmas

12 Days of Christmas


Hi everyone! Welcome to Day 6 of my 12 Days of Christmas Cards. Before we begin, I just wanted to remind you that I have a giveaway happening on my blog at the moment. For all the details on how you can enter, check out this post. 

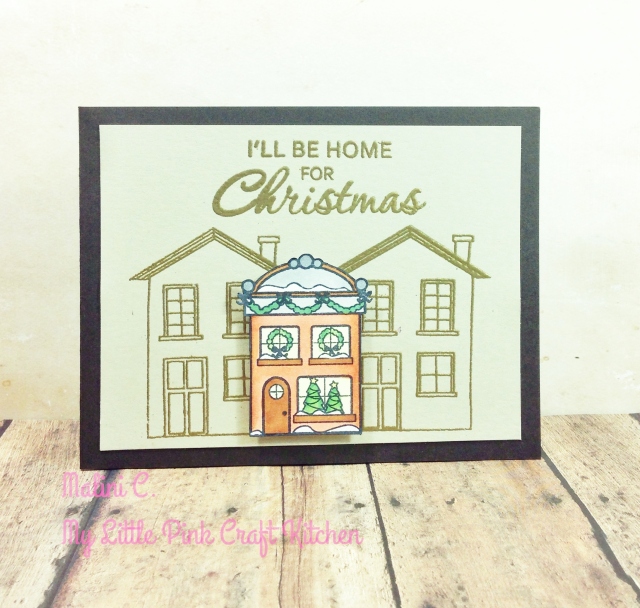
For day 6, I wanted to do a missing you/I’ll see you soon at Christmas card. So using stamps from Hero Arts and Sweet Stamp Shop, I made a holiday town scene.

Here is my card —

ill Be Home for Xmas

I created a video showing the process in which I created the card. You can watch it below or on YouTube.

For a complete list of the tools and products I used, check out the supply list below.

That’s it for this card. Thanks for watching and reading. See you soon for Day 6.

SUPPLY LIST: 

I Scream, You Scream, We All Scream

Hi everyone! I’m here today with a card for a friend of mine who loves ice cream. She is celebrating her birthday soon and I thought it was a great idea to give her an ice cream card.

Here is my card —

I Scream You ScreaM


I started this card with a standard size card with the fold on top from Neenah Solar White card stock. I selected a rainbow paper from Bo Bunny’s Lemonade Stand 6×6 paper pack and adhered it flush on to the base covering the entire front panel.

I used the left over rainbow paper and stamped scoops of ice cream from the Ice Dream stamp set on the different colors of the paper and fussy cut each one. I also stamped the cone and colored it in with Copic Markers. I arranged the scoops in rainbow order and stuck them to each other to look like they were stacked. I attached the entire ice cream cone on a piece of Neenah Solar White card stock cut with a flag banner. For the sentiment, I stamped the “I Scream” message from the same Ice Dream set in Memento Luxe Love Letter ink. For a glossy finish, I heat embossed it with clear embossing powder (my current favorite technique).

To finish the card,  I attached the flag banner on the card base. I also added some DIY enamel dots I made from perler beads.

That’s it for this card. For a list of all the products and tools I used, please refer to the supply list below.

Thanks for reading!

SUPPLY LIST:


Happy Birthday Foxy!

Hi everyone! I’m here today with a card for a couple of challenges that I am combining. I will have the names and pictures of the challenges at the end of the post.

The specifics of the challenges are – using a fox image, using patterned paper, and using critters. I tried joining those 3 requirements on my card.

Here is my card —

Happy Birthday Foxy

I started this card with some Neenah Solar White card stock cut to a standard size card with the fold on top. I used the woodgrain paper from Lawn Fawn’s Into the Woods 6×6 paper pad to cover the entire front of the card. For the focal point, I created a shaker panel using more papers from the Into the Woods 6×6 paper pad and the Into the Woods sequin mix. I used a double layer of foam  tape to raise the image. For the circle panel and scallop borders, I used the Sizzix Framelits nesting dies.

I used the fox from Lawn Fawn’s Critters in the Forest stamped on Simon Says Stamp 120lb card stock using Memento Tuxedo Black ink. I colored it ion with Copic markers (Thank god for the upcoming Online Card Class — I need all the help I can get). I cut the image out and attached it to the shaker panel with foam squares. For added interest, I covered the fox with some Clear Wink of Stella glitter pen.

For the sentiment, I used the ‘Happy Birthday” semtiment from Lawn Fawn’s Hats Off To You set combined with Milo’s ABC to create a custom sentiment to match the fox.

That’s it for this card.

I am entering this card for the following challenges —

1. Moxie Fab World Foxy Foxes Challenge

2. Virginia’s View Challenge  – using patterned paper

vview


3. Lawnscaping Challenge  – Critters Galore (using a critter)

citter

For a list of the products I used in this card, please check the supply list below.

Thanks for stopping by.

SUPPLY LIST:

Miss U

Hi everyone! I’m here today with a card for MFT Get Sketchy challenge.

Print


Here is the sketch for this challenge —


MFTWSC191


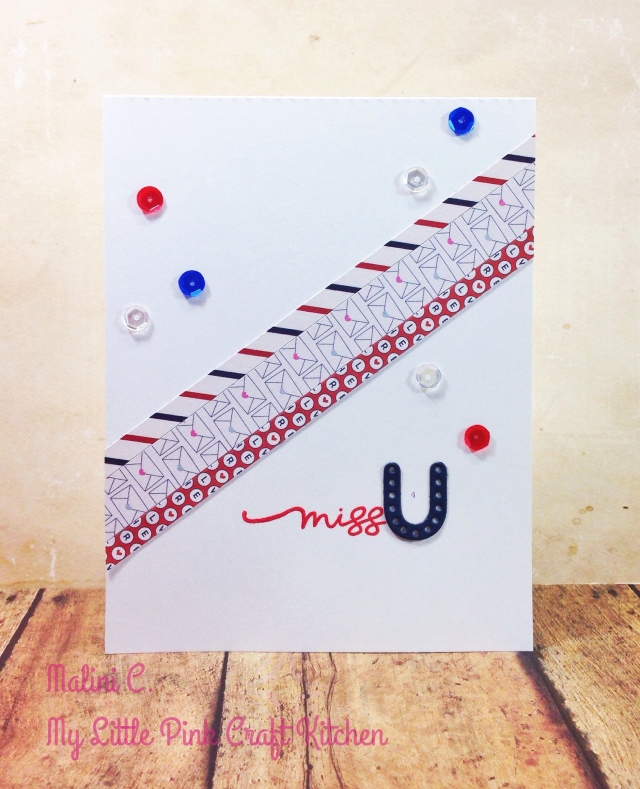
Here is my card —

Miss U

I started this card with Neenah Solar White card stock cut to a 4 1/4 x 5 1/2 standard size card with the fold on top. I followed using the strips of paper from the sketch, I cut 3 strips of paper from Pink Paislee’s Pen Pal collection. The two outer strips measures 1/4 inch and the center strip measures 1/2 inch.

For the sentiment, instead of using a raised circle image, I just made it the focal point to act as the circle part from the sketch. Using Simon Says Stamp Thinking Of You set, I masked the “ed” from the word missed. I stamped it in Memento Luxe pigment ink in Love Letter and heat embossed with clear embossing powder. For the “U”, I die cut the letter die cut from the Bright Lights Alpha from My Favorite Things using some Bazzill Blueberry Sour card stock. I adhered the “U” close to the miss to form the Miss U sentiment. To finish the card, I embellished with assorted sequins from Pretty Pink Posh.

That’s it for this card.

For a list of all the products I used, please check the supply list below.

Thanks for reading!

SUPPLY LIST:


I Love You More Than Ice Cream, That’s A Lot – SSS August 2014 Card Kit

Hi everyone! Im here today with a card for the RetroSketches Challenge using supplies from the Simon Says Stamp August Card Kit.

Here is the sketch for this challenge —

rs128

Here is my card —

I Love You More Than IceCream

I started this card with some Neenah dessert Storm card stock cut to  a standard size with the fold on top. I cut a piece of patterned paper from Bo Bunny that was included in the kit. I attached it to the front of the card tilted. For the diamond, I cut a die border from Sizzix on some brown paper.

For the focal point, I cut a circle from the Sizzix Circle Framelits and attached the variety of ice cream. I colored the sweet treats using Spectrum Noir markers. I attached the circle to the center of the card. For the sentiment, I heat embossed on gold embossing powder.

To finish the card, I added some sequins from Pretty Pink Posh and added glitter accents to the ice cream.

That’s it for this this card. Thanks for reading.


Love You Tons

Hi everyone! This card is an entry for CAS(E) This Sketch challenge.

Here is the sketch for this week

CTS_87

This week, they joined forces with Tag You’re It. So this weeks challenge needs to either be a tag or have a tag incorporated to the finished project.

TYIC_Badge

Here is my card —

Love You Tons

I started this card with some Neenah Solar White card stock cut to a standard size card with the fold on top. I colored some Wendy Vecchi embossing paste with Simon Says Stamp ink in Cotton Candy. I placed the chevron stencil from The Crafter’s Workshop on the card base and masked off the right side. Just like the sketch, I only wanted the texture on the left side. After spreading the paste and letting it dry, I started with my tag element. I recently got the Lawn Fawn Love You Tons set which was a surprise gift from my sister (she loves surprising me with crafty things that make happy). I stamped the elephants and colored them in with the Grey and Pink sets from Spectrum Noir. I stamped the tag from LF’s Tag You’re It from a piece of paper from Pink Paislee with VersaMark and heat embossed it with silver embossing powder from American Crafts. I die cut the tag using the coordinating die and attached the elephants. I stamped the hearts from the Happy Thoughts set from Simon Says Stamp in Lipstick Red ink. I attached the tag to the card and added some pink twine.

For the sentiment, I cut a strip of Neenah Solar White and stamped the sentiment from the Love You Tons set with VersaMark and heat embossed it with the same silver embossing powder. I wanted it to be more than a banner, so I cut one side of the sentiment strip like a regular banner and I cut the other side at a diagonal for added interest. I added it with foam squares to the bottom of the card.

To finish the card, I accented the elephants and hearts with the Clear Wink of Stella glitter brush pen and added some sequins from Pretty Pink Posh.

That’s it for this card.

For a complete list of all the product and tools I used, please check the supply list below.

Thanks for reading. I will be back soon with more cards from the ongoing class at Online Card Classes.

SUPPLY LIST:

Online Card Class Days 1 and 2 – Background Stamps

SYS2_participant

Hi everyone! I’m here today with some homework for Online Card Classes. I have been a little off the radar ever since class started and I just recently watched the first few days of class. For this post, I have 3 cards I made for Days 1 and 2. I didn’t have any of the stamps they suggested but I shopped my stash and found 2 woodblock stamps from Stampabilities that I purchased from Hobby Lobby. I decided to use both those stamps – one was a quatrefoile stamp that is great for coloring like Kristina’s technique and the other which is the tapestry stamp which is perfect as a reverse background stamp.

Here are my cards —

CARD #1

Thanks Watercolor

I started this card with some Bazzill card stock in Licorice Twist cut to a 4 Bar card with the fold on top. For the panel, I used some Strathmore watercolor paper. I stamped the Quatrefoile background with VersaMark and embossed the image with some AC Zing white embossing powder. I decided to try the water coloring technique that Kristina shared. I colored the spaces with watercolor in a rainbow order but vertically.

For the sentiment, I die cut the Thanks die from SSS at the center of the watercolor panel and also from some Licorice Twist card stock. I inlaid the black thanks on the watercolor panel. To finish the card, I attached the panel on the card base with foam tape and added some black enamel dots from My Mind’s Eye.

CARD #2

You're Very Strong


I started this card with some Bazzill Licorice Twist card stock cut to a 4 Bar card. I also used the same color for the front panel. I stamped the Stampabilities Tapestry stamp. I stamped the image on the panel with some Versamark ink and before it could dry I brushed on some Perfect Pearls powder in bubblegum. This was the technique that Jennifer Mcguire taught and I just fell in love with it. After the finished brushing the powder, I misted some water and heat set the panel to dry.

For the sentiment, I cut a circle using the smallest shape in the Sizzix Circle Framelits set. I traced the placement of the circle, and stamped a sentiment from the Simon Says Stamp Love This set in VersaMark. Then I heat embossed it with AC Zing Silver Metallic embossing powder. To finish the card, I adhered the front panel to the base with some foam tape.

CARD #3

XOXO Hugs and Kisses Emboss Resist

I started this card with some Neenah Solar White card stock cut to a 4 Bar card. For the front panel, I used some Strathmore water color paper. I stamped the Quatrefoile stamp with VersaMark and heat embossed it with some AC Zing White Embossing powder. I sponged on Distress Inks  with different shades of blue. I started with Broken China at the bottom, then Peacock Feathers in the middle and Tumbled Glass on top. While I was adding each color, I made sure to blend them together. To give it a water color look, I spritzed the panel with water and left it to dry. I love splotches it created.

For the sentiment, I used the Hero Year Round Greetings. I stamped the message on Neenah Solar White card stock cut to a small frame using the Sizzix Framelits Borders. I stamped it with black pigment ink and heat embossed it with some AC Zing Clear embossing powder. I looped some black twine at the center of the panel and adhered my border sentiment on top. To finish the card, I attached the panel to the base and adhered some sequins from Pretty Pink Posh.

That’s it for the first 2 days of class. I’m quite behind with the lessons so it will take a while for me to catch up with all the lessons. But I will definitely be back with cards for days 3 and 4 very soon.

For a list of tools and products I used, please check the supply list below.

Thanks for reading.

SUPPLY LIST :

Hang In There

Hi everyone. Today’s card is another share from the SSS July 2014 card kit. I’ve really had a lot of fun with this kit and I am very excited to move on to the August kit.

This card is an entry for the Simon Says Stamp Wednesday Challenge. The challenge for this week is ANYTHING GOES.

wednesdayblog-logo

wed-newchallenge-header

This is also an entry for A Blog Named Hero‘s most recent challenge. The challenge theme is Die A Little.

challenge-49

Here is my card —

Hang In There

I started this card with 4 3/4 by 4 1/4 card from Neenah Solar White card stock. I adhered a piece of patterned paper from Pink Paislee over the entire front of the card. The front panel, I cut a piece measuring  1/4 x 3 3/4 from more Neenah Solar White card stock. I die cut a few pieces of the hanger die cut from the Thanks For Your Support coordinating die set from SSS. I stuck each hanger together and for the top most piece, I covered it in VersaMark and heat embossed it with silver embossing powder for American Crafts. That made it look like a steel/metal hanger which was the look I was going for.

For the envelopes, I stamped the smallest envelope from the Happy Thoughts stamp set on different patterns from Pink Paislee. I attached the envelopes on the hanger with blue twine from Maya Road. For the sentiment, I used Milo’s ABC from Lawn Fawn in Memento Paris Dusk ink and a sentiment from the Love This set using Lipstick Red ink. I rounded the corners of the front panel and adhered it with foam tape.

That’s it for this card. For a list of the tools and supplies I used on the card, please check the supply list below.

Thanks for reading.