Spread Your Wings

Hi everyone! I’m here with a card that I will be entering into a few challenges.

Here is my card

I started this card with Canson XL Student Grade watercolor paper. I decided to use the mini distress ink pad from Tim Holtz and just swipe it on the paper. To soften the lines, I went over it with a damp paintbrush.

For the sentiment, I used a Ranger wood stamp with Versafine Onyx black ink. I used the same ink with the Stampabilities butterfly stamp. I heat embossed the sentiment and image with clear embossing powder.

To finish the card, I adhered some Sparkling Clear sequins from Pretty Pink Posh.

I am entering this card for the following challenges:

CAS(E) This Sketch – Challenge #228

AAA Cards – Words Take Centre Stage / Words Have Power

CAS-ual Fridays Challenge – TicTacToe (Butterflies-One Layer Card-Stripes)

Addicted to Stamps and More – Clean and Simple card

For a list of the tools and supplies used, please check below.

  1. Canson XL Student Grade watercolor paper
  2. Tim Holtz Distress ink – Abandoned Coral, Fossilized Amber, Salty Ocean
  3. Ranger/Dylusions Wood Stamp – Wings Quote
  4. Stampabilities Wood Stamp – Tiny Butterfly
  5. Versafine Onyx black ink
  6. American Crafts Zing Clear Embossing powder
  7. Pretty Pink Posh Sparkling Clear sequins
  8. Ranger Multi- Matter medium.

Thats it for this card. Thank you for reading.

I’m Back!!!!! and a new card

Hi everyone! It’s been almost two and a half months since my last post and since I made a card. My life these past two months were far from uneventful. My uncle came into town and stayed for a month and I spent most of my time with him. After he left, I just couldn’t get back into the swing of things. I felt pressured to make a card and every time I sat down to make one, my creative juices were completely dried up. I gave up and did something else and that happened pretty much everyday for the next month or so. I tried so hard but nothing worked. So I decided to give it some time and step away. Then today, I was watching a video tutorial on YT and I felt like creating. So here we are….

I started with the different challenge blogs I frequently join and listed the ones I wanted to join. This brings us to today’s post…

Here is my card –

IMG_5966


I started this card with some Hero Arts Snow layering paper cut to a card base measuring 5 x 3 3/4 inches. I masked off a 1 inch column vertically towards the left of the card stock. I stamped the different flowers from the Truly Appreciated set from Hero Arts. I decided to use Versafine Onyx Black ink so I could clear emboss the flowers. For the shading, the wanted to have an ombre effect, I used the following inks – Hero Arts Soft Pool, Hero Arts Tide Pool, and Simon Says Stamp Audrey Blue. For the sentiment, I used one of the greetings from the Little Hoot set from Hero Arts again stamping it in Versafine Onyx black and clear embossing powder.

To finish the card, I added some enamel dots from My Minds Eye and black gemstones from Hero Arts.

That’s it for this card.

This card is an entry for the following challenges:

1. Simon Says Stamp Wednesday Challenge – Clean and Simple featuring Hero Arts products

wednesdayblog-logo

wed-newchallenge-header

2. A Blog Named Hero – One Layer Challenge

one layer


3. CAS-ology Challenge – CUE CARD-Ombre

Week 143 - Ombre


For complete list of the products and tools I used, please check the Supply List below.

Thank you for stopping by and I will be back soon with another card.

SUPPLY LIST: 

Happy Birthday!

Hi everyone! I’m here today with a card using a couple of sketches from 2 different challenges. I know it’s ironic that I decided to combine two sketch challenges because realistically it would just be a mess. But both sketches I used are very similar.

This card is an entry for the CAS(E) This Sketch Challenge. This is the sketch —

CTS_105


And this is sketch for the My Favorite Things sketch challenge.

210

So when you look at both sketches, they are very similar. A frame/panel, a focal point on the left and the sentiment next to it. The only difference is the orientation. So I may be crazy but I decided to incorporate both sketches and make it my own.

Here is my card —

Happy Birthday Doggie


I started this card with some Carnation layering paper from Hero Arts cut to a landscape card with the fold on top. I used the star backdrop from Lawn Fawn’s Teeny Tiny Backdrops. I wanted to stamp the background and have a tone on tone effect, so I used Cotton Candy ink from Simon Says Stamp. For the frame, I used the two biggest rectangles from the My Favorite Things Stitched Rectangle dies. I cut a frame from some gold paper from the Glitzy Glitter paper pack from Die Cuts With A View.

For the focal image, I stamped the dog from the Cupcake Cutie set from My Favorite Things and colored it in with Copic markers. I will have all the colors in the supply list below. I cut the image with a circle punch and I cut another balloon and adhered it with foam adhesive. I also added some clear Wink of Stella to the balloon and the ribbon on the dog. Then I added Glossy Accents to the balloon. For the sentiment, I stamped the birthday greeting from the same Cupcake Cutie set on a strip of Carnation layering paper with Versamark and heat embossed it with gold embossing powder.

To finish the card, I placed some gold and pink enamel dots from My Mind’s Eye.

That’s it for this card. For a complete list of the supplies I used, please check the supply list below.

Thank for reading! See you soon.

SUPPLY LIST:


I Hit The Bulls Eye

Hi everyone! I’m here with a card for the Lawnscaping Challenge over the Lawnscaping blog. The theme for the challenge this week is “Stars and Stripes”.

84

I know that the theme is geared towards more patriotic cards but I really had fun using the striped patterned papers includined the Hello Sunshine 6×6 paper pack from Lawn Fawn. So that was the route I took.

Here is my card —


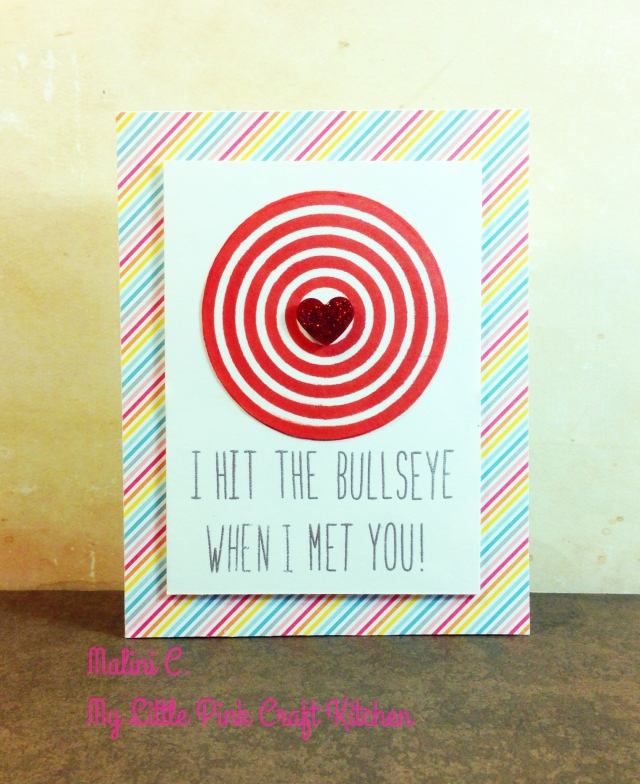
I Hit The BullsEye


I started this card with some Neenah Solar White card stock cut to a standard size card. I adhered the front completely with the rainbow striped patterned paper from Lawn Fawn’s Hello Sunshine 6×6 paper pad. For the front panel, I used the rainbow stencil from Simon Says Stamp and colored it in with the some SSS Lipstick Red ink using a mini sponge dauber. When the top part of the rainbow was finished, I inverted the stencil and colored the rainbow again – meeting both edges to form a target.

For the sentiment, I used LF’s Milo’s ABC. I am in love with this alphabet set. I think its very versatile and I love the thin and tall letters. I created my own sentiment to match the target. I stamped it with VersaMark ink and embossed it using Zing Silver Metallic embossing powder.

To finish the card, I colored a small part of the card stock with the Lipstick Red ink and punched out a small heart. I covered the heart in red glitter and topped it off with Glossy Accents to seal the glitter and I attached with with foam adhesive at the center of the bulls eye.


Wednesday Card Day – On Your Special Day

Wednesday Card Day Intro

Hi everyone! I’m here today with a card using the supplies from the Simon Says Stamp May 2014 Card Kit. Now I’m going to be honest but I had a very difficult time thinking of cards that I wanted to make with this kit. Maybe my lack of experience in making masculine cards was the culprit. But I finally came up with something simple. I will try and make more with this kit to try and stretch my creativity.

Here is my card —

On Your Special Day


I started this card with Neenah Solar White card stock cut to a standard size card. I covered the entire front panel with the tweed/chevron patterned paper from the Be Different collection from Fancy Pants included in the kit. For the image and sentiment panel, I cut some Neenah Solar White card stock to 4 1/2 by 3 3/4. On the panel, I adhered 2 of the sneaker images from the SSS All Boy stamp set included in the kit. One was colored blue and the pink. I colored the images using Bic Mark It markers and I accented some parts with some Wink of Stella clear glitter pen. For the sentiment, I used the Card Phrases set from Stampabilities. I cut the stamp so it would fit on the front. I stamped the first and last part of the sentiment with Staz-On Jet Black ink and the I stamped the scripted sentiment with SSS Lipstick Red ink. To finish the card, I added a heart in between the 2 sneakers to make it look like a wedding themed card. I accented the heart with Elmer’s red glitter glue. I also rounded the corners of the front panel for added interest.

That’s it for this card. You can watch the video process here below or on YouTube


SUPPLY LIST:

1. Neenah Solar White card stock
2. Simon Says Stamp May 2014 Card Kit (patterned paper and stamp set)
3. Memento Tuxedo Black ink
4. Staz On Jet Black ink
5. Bic Mark It Markers
6. Elmer’s Glitter Glue
7. Stampabilities Card Phrases stamp set
8. SSS Lipstick Red ink

Just Knowing You Makes Me Happy

WC_participant

Hi everyone! I’m here today with a card for the Online Card Classes current class – Watercolor for Card Makers. Before I share my card, I just wanted to inform my lovely readers that I will not be having a Wednesday Card Day video this week. I’m quite wrapped up with the class I wont have time to edit between my job and time I want to spend playing with the different techniques we are learning in class. However, I will try to post my homework cards everyday (which is what I have for you today). I will defintely have a video next week.

Now on to my first homework card –

Just Knowing You Makes Me Happy

The first lesson was creating watercolor backgrounds and Jennifer Rzasa showed a technique using stencils which I really found unique and interesting. Now I have a confession to make, I don’t really have a proper watercolor palette and I wasnt sure if I wanted to purchase one since I already had my Inktense pencils and Distress Ink pads and markers to use. So when I saw the Crayola 8 color Palette at my local grocery store, I decided to try and test my skills before purchasing a better palette. To my surprise, I loved the effect. This card was created entirely with the Crayola 8 color set and the paintbrush included.

On some Strathmore watercolor paper, I used 3 different colors – red, orange and yellow and I let them blend within each other. The stencil I used was the Chevron stencil from The Crafter’s Workshop. For the sentiment, I used the Color and Sunshine set from Simon Says Stamp using Staz-On Jet Black ink.

To finish the card, I adhered the watercolor panel on to a Bazzill Black Licorice card base.  I also added some Sparkling Clear sequins from Pretty Pink Posh and black enamel dots from My Mind’s Eye.

That’s it for this card. I will try to be back today with another homework card.

Thanks for reading.


You Brighten My Day

Wednesday Card Day Intro

Hi everyone! Today’s post is a Wednesday Card Day post — and yes I know it’s Friday but things have been hectic and I haven’t had the chance to sit down and write a blog post. Finally some free time came about and now I am sitting writing this post.

I really love the Simon Says Stamp Card Kits and there have definitely been a few kits that I cannot stop using and others which I don’t use as much. This months kit is definitely those “I cannot stop using” kits. I love everything about the kit and the stamp set is pretty awesome.

So here is my card using the April Kit – even though its already May 🙂

You Brighten My Day


I really wanted to have a pink and black color effect card since its one of my favorite combinations. I also love the stamp set and decided to use silver embossing powder. I’ve had the Zing silver embossing powder and for some reason it never gave me the metallic finish that I wanted. I recently went to Michael’s and saw their Recollections line and loved a lot of the embossing powders. I tried the silver and champagne which are now my two favorite colors and definitely has made Recollections my favorite brand of embossing powders after the Hero Arts white.

For the final embellishment, I have been recently loving sequins as it is growing in popularity. I found these sequins in my stash. My mom made a backdrop cloth for my sisters wedding and these were the extra sequins. There were a lot left so I took them to use for cards. I added the sequins inside the heart and on the inner border of the light bulb.

Here is a video of the card process which you can watch here or on YouTube.


SUPPLY LIST:
1. Simon Says Stamp April 2014 Card Kit  (Doodlebug black chevron paper, SSS exclusive stamp – You Brighten My Day)
2. Neenah Solar White card stock
3. Bazzil Candy Hearts card stock
4. The Paper Studio A2 Dots embossing folder
5. Vellum
6. Recollections Silver Detail Embossing folder
7. VersaMark ink 
8. Mini silver sequins 
 

That’s it for today. Thanks for reading and watching!


SSS January 2014 Card Kit – Completed

Hi everyone! I’m here with an update for the Simon Says Stamp January 2014 card kit. Starting with the January kit, I will be doing a post like this at the end of the month to close out the kit. I have already blogged about 4 cards I have made and you can read them here, here, here and here. To close out this kit, I have made 4 additional cards.

For cards 5 and 6, I wanted to use the ticket strips from Fancy Pants since I haven’t touched it.

Card #5 – Happy Valentines Day (Ticket Strips)
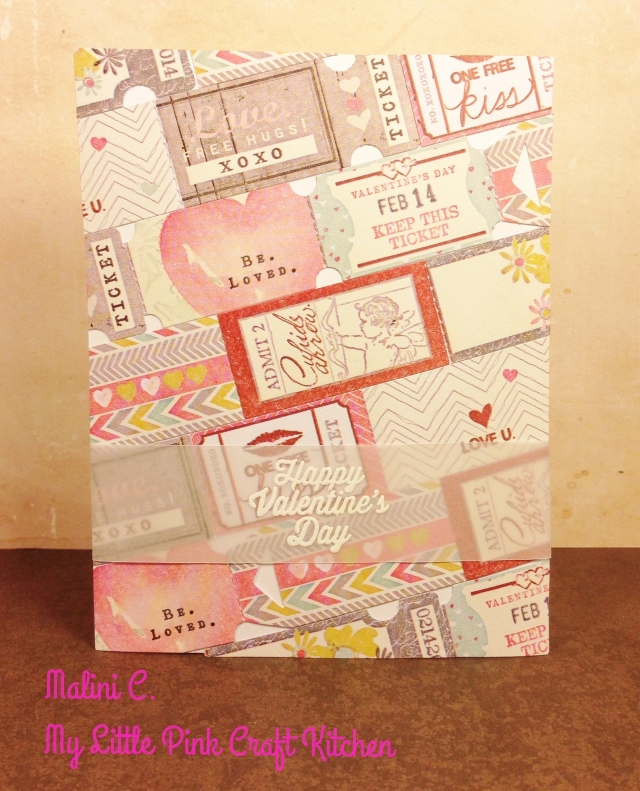
Happy Valentines Day - Ticket Strips

For this card, I used the ticket strips as a border through out the front panel of the card. I attached it to the front of a white standard size card base. For sentiment, I stamped it on vellum with Versamark ink and embossed with white embossing powder. I have always used flour as my powder tool but recently I made my own powder tool which I will blog about. It only cost me 2 dollars and I think it works better than flour.

Card #6 – Be Loved, Love You

Be Loved Love You

For this card, I wanted to use more of the ticket strips. I saw this video from Kristina Werner using the January 2013 SSS kit and the focal point was a ticket strip. So I used her idea and CASE’d her card. I just love Kristina’s style of card making and her videos were what got me started in this hobby.

I made a border frame from the pink chevron paper and adhered it towards the center of the card. I used another paper strip from collection and punched a scallop border with the American Crafts Knockouts. I tied some twine included in the kit and placed a gem at the center of the bow. For the sentiment, I picked 2 ticket strips that could work as sentiments and attached it to the card.

Card #7 – Hello You! Love You! Be Mine?
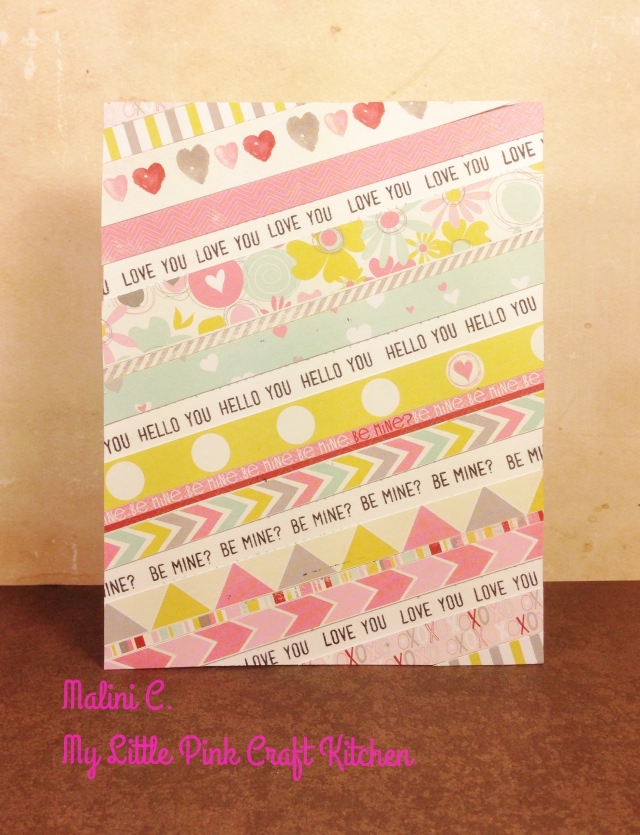
Hello You Be Mine Love YouFor this card, I used different strips of patterned paper from the kit and adhered them diagonally on the front panel. And in between the strips, I used the small sentiments from the Only Have Eyes For You set and repeatedly stamped it on the spaces with Memento Tuxedo black ink.

Card #8 – Hello You! I (Heart) You 

Hello You! I Love YouFor this card, I wanted the monster to be popping out of windows. I colored the monsters with alcohol markers trying to practice my color blending. I’m still a work in progress but I will never stop trying until I get it right. I used googly eyes to add some dimension. I used a small banner from Sizzix and stamped the sentiments from the set using white embossing powder. I used a strip of patterned paper and used the American Crafts KnockOuts to punch a heart border. To finish the card, I adhered the border and rounded the bottom corners.

That’s it for the January 2014 kit. Even though its quite late, I will make a few cards for the February Kit and blog about those cards.

Thanks for reading.

Online Card Class – Stenciled


Hi everyone! I have been juggling many different things in the past few weeks and these next couple of blog posts are for me to catch up with many cards I haven’t blogged about.

This first post is all about the recent Online Card Class I took called STENCILED. It was an amazing class and I learned many techniques in using stencils. I blogged one card I made and I will share the rest of them in this post.

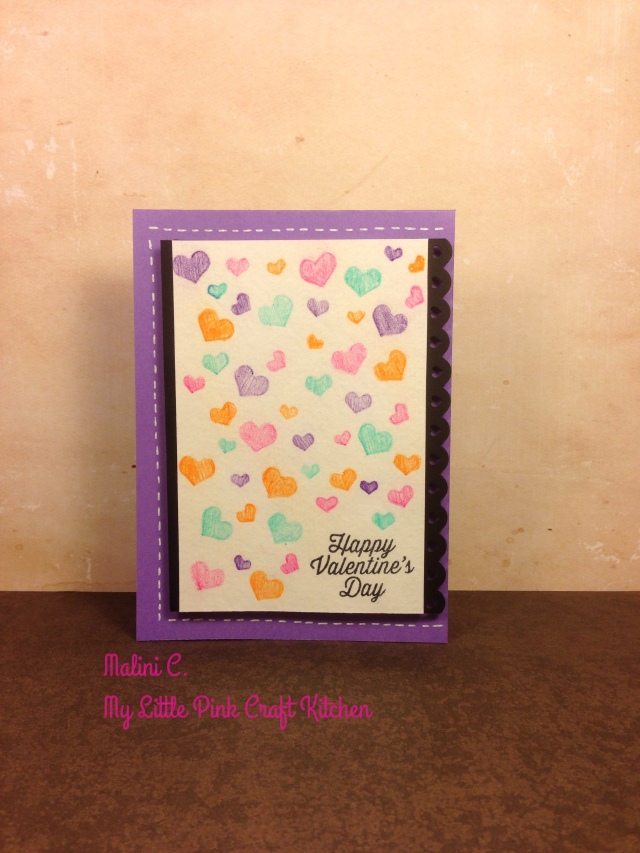
STN_participantThe first card I’m going to share is a Valentines day (sorry for the delay) card where I traced the stencils with colored pencils just like Kristina shared. Here is the card —

Happy Valentines Day - Stencil


I started this card with some Neenah Creative card stock in Wisteria cut to a standard size card. Then on a panel of Strathmore water color paper, I traced some hearts from a Heidi Swapp stencil using watercolor pencils. I intended to blend the hearts with water but at the end, I just decided to leave it as is and not add any water. I stamped the sentiment from SSS Only Have Eyes For You set in Memento Tuxedo Black ink. I attached the watercolor paper to some black card stock. I punched the side with the heart border from American Crafts KnockOuts. To finish the card, I attached the black panel to the Wisteria card stock and drew some  dash lines with a white gel pen.

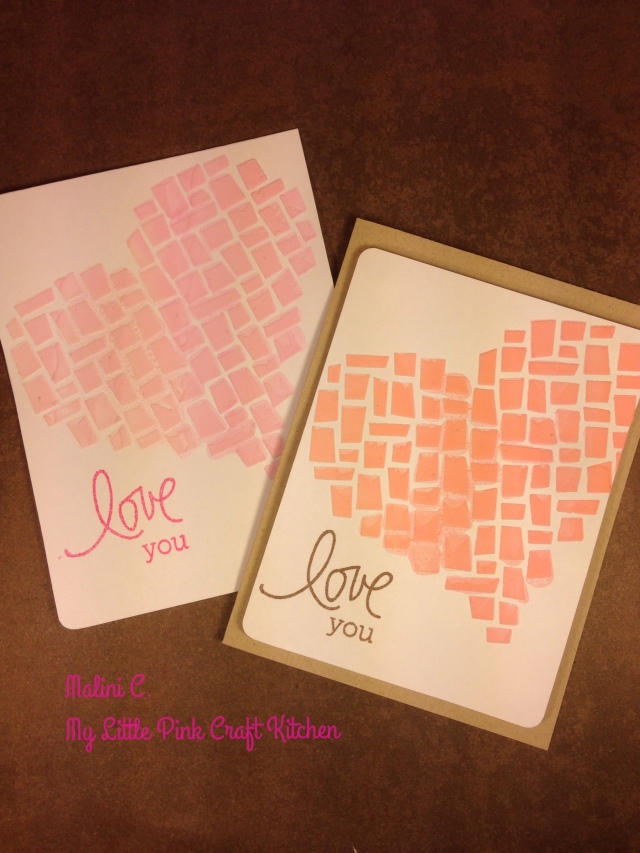
For my second card, I wanted to use embossing paste which has been growing in popularity very quickly. As quickly as I got excited about, I realized that I wasn’t really good at it and needed more practice to perfect it. I made two very similar cards, here they are  –

Love You - Mosaic Heart stencil


I used the SSS Mosaic heart stencil for the card. I used some ink pads to color the paste and then spread it out. For the one on the left, I used Memento Rose Bud ink and for the one on the right, I used Hero Arts Pale Tomato ink. I realized that its not that easy to apply the paste and it took me a while to realize that I had to load my spatula from the back – thus the splotchy mess towards the bottom of the heart. For the sentiment, I used the Love This set from Simon Says Stamp and customized it to say “you” instead of “this”

So these are the cards I created for the Online Card Class – Stenciled. Class may be over, but I will continue to use stencils on future cards.

That’s it for today! Thanks for reading.

Sending You Buckets of Happy

STN_participant

Hi everyone! I’m here today with a card for Day 1 of Online Card Classes. The class is all about stencils and different ways we can use them. For day 1, it was the basic use stencils using sponging and spritzing. To be honest, this was the only way I thought stencils could be used. Of course I was wrong and the next 3 days of classes showed me that.

Here is my card —

Sending You Buckets of Happy


I started this card with some Citrus Yellow card stock from Neenah Creative Collection cut to a standard size card with the fold on top. For the panel, I used panel of Neenah Solar White cut to 5 1/2 by 3 inches. I masked of the center line with some Post It sticky tape. For the background, I used an inexpensive flower stencil I got at Hobby Lobby for less than 3 dollars. It had different sizes of flowers which I used. I sponged the flowers randomly throughout the panel using Memento inks in Rosebud, Tangelo, Dandelion, Bahama Blue and Grape Jelly. For the masked sentiment area, I used the Love This stamp set from Simon Says Stamp. I selectively stamped the Sending You Buckets of Love sentiment using Memento Tuxedo Black but did not ink the word love. Instead I used happy and placed the it’s gonna be ok” sentiment below. To finish the card, I placed to think strips of Bazzil’s Pansy card stock as a side border which gives the card a finished look.

SUPPLY LIST
1. Neenah Creative Collections card stock in Citrus Yellow
2. Neenah Solar White card stock
3. Bazzill card stock in Pansy
4. flower stencil from Hobby Lobby
5. SSS stamp set – Love This
6. Memento Inks  – Tuxedo Black, Rosebud, Tangelo, Dandelion, Bahama Blue, Grape Jelly
7. Imagine Crafts sponge daubers
8. Post It sticky tape
9. AdTech adhesive dot runner
 

That’s it for this  card. I will do some more homework cards for days 2-4 first but I will be back later in the week with a card the is the CASE of an amazing card that Debby Hughes shared on Day 1.

Thank you for reading!