Hello Sunshine

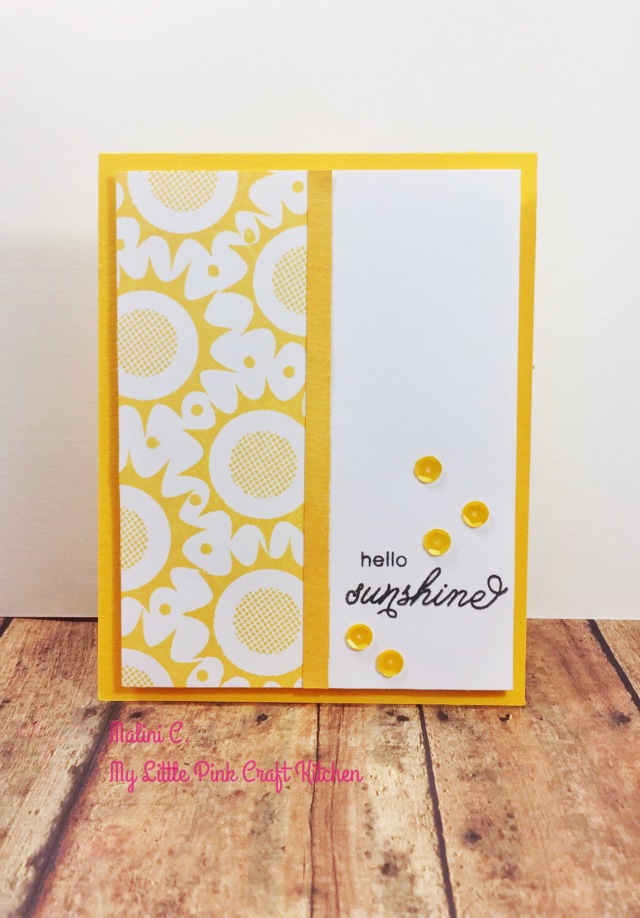
Hi everyone. I’m here with a card featuring some older Simon Says Stamp products. I am entering this card for the Simon Says Stamp Wednesday Challenge. 

The theme for this week is Summer Sunshine

Here is my card –

I started this card with panel of Neenah Solar White card stock. I masked the left side and repeatedly stamped the sun image from the Color and Sunshine stamp set using Butter Bar ink from Hero Arts. For the centers of the sun, I used a circle stamp from Love This with the same Butter Bar ink. For some separation, I used the Butter Bar ink and applied it directly to the paper so I could cut a strip with the same yellow shade as my stamping. I cut the colored strip to 1/4 inch and attached it to the card.

For the sentiment, I used a greeting from the Color and Sunshine set and stamped it with Versafine Onyx Black ink and heat embossed it with clear embossing powder.

To finish the card, I adhered some Marigold sequins from Pretty Pink Posh with the Ranger Multi Matte medium liquid glue. I attached the panel to the card base made from Simon Says Stamp Sunshine card stock.

That’s it for this card. For a complete list of the all the tools and products I used, please check the supply list below.

SUPPLY LIST:

  1. Neenah Solar White card stock
  2. Simon Says Stamp Sunshine card stock
  3. Simon Says Stamp Color and Sushine
  4. Simon Says Stamp Love This
  5. Hero Arts ink in Butter Bar
  6. Versafine Onyx Black ink
  7. American Crafts Zing Clear Embossing Powder
  8. Pretty Pink Posh Marigold sequins
  9. Scotch Foam Tape
  10. Elmer’s Glue Dot Runner
  11. Ranger Multi Matte Medium Liquid Glue

You Are My Favorite Friend

Hi everyone! I’m here with a card for the Simon Says Stamp Wednesday Challenge.

wednesdayblog-logo

wed-newchallenge-header

For this card, I used the supplies that came with the June 2014 card kit. This card kit, like all the other kits is a great value and in my opinion one of the best kits that has been released. The theme for the SSS Wednesday Challenge is “You Gotta Have Friends”.

Here is my card —

You Are My Favorite Friend


I started this card with Bazzill Candy Hearts card stock cut to a standard size card with the fold on top. For the front panel, I used Neenah Solar White card stock cut to 5 x 3 3/4 inches. For the background of the white panel, I used a technique that Jennifer McGuire demonstrated on this card. Jennifer demonstrated this technique using blues and greens to create a water scene. I decided to use greys to create a neutral background. Any alcohol marker will do but I used the Fine Touch markers in different shades of warm grey.

For the flowers, I stamped the different circle flowers using lighter inks and the details of the flowers using darker inks. I will mention every ink color I used in the supply list below. For the sentiment, I also used the Favorite Flowers set that came with the kit. Using Studio G black pigment ink, I stamped the sentiment and used some Martha Stewart clear embossing powder to make the sentiment pop.

To finish the card, I attached the panel to the base and accented the flowers and leaves with the Clear Wink of Stella glitter pen.

That’s it for this card. I will be back soon with more cards from this card kit.

SUPPLY LIST:

1.  Simon Say’s Stamp June Card Kit

2.  Bazzill Candy Hearts card stock

3.  Neenah Solar White card stock

4.  The Fine Touch Markers – Warm Greys WG 0.5, WG 2, and WG 4

5.  Simon Says Stamp Favorite Flowers set

6.  Studio G black pigment ink

7.  Martha Stewart clear embossing powder

8.  Memento inks (Grape Jelly and Lulu Lavender)

9.  Simon Says Stamp inks (Island Blue and Green Leaf)

10. Hero Arts inks (Soft Pool, Tide Pool, Passionflower, Ultra Pink, Soft

Cantaloupe, Pale Tomato, Cornflower Blue, Butter Bar, Dark Quartz)

11. Wink of Stella Clear Glitter Pen


Wednesday Card Day – Just Arrived

Wednesday Card Day Intro

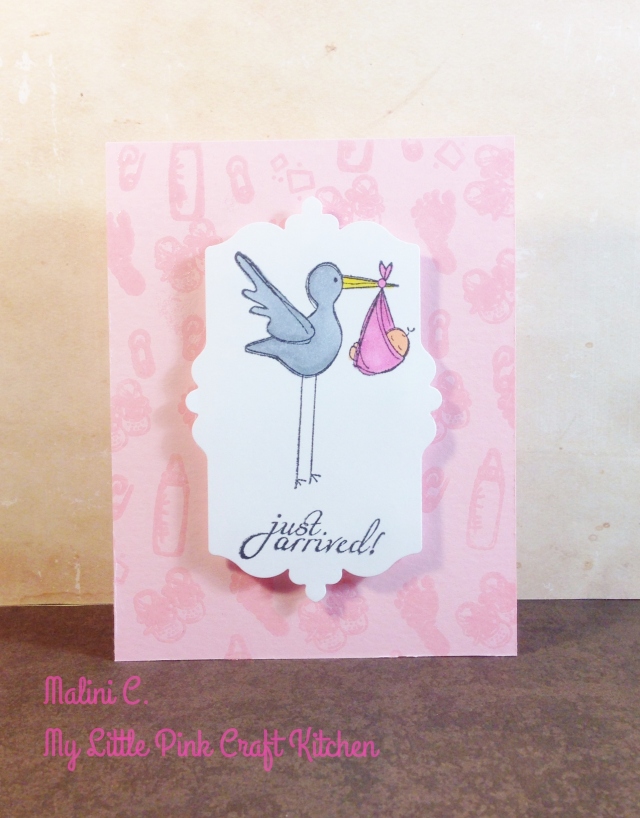
Hi everyone! I was recently at Michael’s and they had a huge sale on their older stamps and when I saw two baby themed sets from Fiskars and Stampendous, I couldn’t resist. So I decided to use them for today’s cards. Here is my first card —

Just Arrived Girl

I started this card with some Bazzill card stock in Cotton Candy cut to a standard size card. I used some of the mini images from both sets to create my own background. I repeatedly stamped the images in Versamark and then heat embossed it with some Martha Stewart clear embossing powder. I originally wanted to use sparkle embossing powder but I did not like way it looked so I changed my mind and used clear instead.

For the front panel, I cut the third biggest die from the Sizzix Fancy Labels #3 die set from white card stock. I positioned the stork and sentiment from the Fiskars set and stamped it with Memento Tuxedo Black ink. I colored in the image with an assortment of marker brands – I used the Fine Touch markers from Hobby Lobby and a few Bic Mark It markers. I don’t really know how to blend alcohol markers so I normally just do fast coloring and try to blend based on what I think looks right.

To finish the card, the attached the front panel with foam squares and applied some glitter to the baby blanket with my Wink of Stella clear glitter pen.

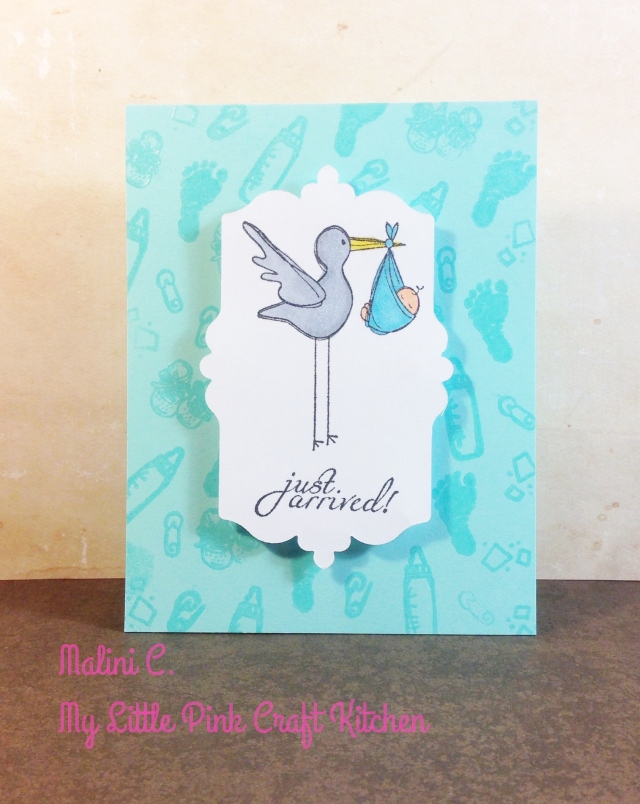
I also made a blue version for a baby boy —

Just Arived Boy

For this card, I did the exact same thing as I did with the pink card except that the card stock I used was Robin’s Egg Blue from Bazzill.

SUPPLY LIST
1. Fiskars stamp set  – Special Delivery
2. Stampendous stamp set – Baby Invite
3. Bazzill card stock in Cotton Candy (girl card) and Robin’s Egg Blue (boy card)
4. Neenah Solar White card stock 
5. Versamark ink
6. Memento Tuxedo Black ink
7. Martha Stewart embossing powder
8. Bic Mark It markers (Pink Flamingo and Yellow Blaze)
9. The Fine Touch Markers from Hobby Lobby ( CG1, CG3 Cool Gray, YR25 Salmon Pink, PB76 Sky Blue) 
7. Sizzix Fancy Labels #3 (3rd biggest die)
 
 You can watch the video here —


Thanks for watching

Thinking of You

Hi everyone! For today’s card, I used supplies from the February Card Kit from Simon Says Stamp. I really love this kit especially the stamp set which is so versatile and elegant.

I saw this card that Nichol Magouirk made with the kit and I wanted to do something similar. It was such a pretty card and I just fell in love with it. Nichol used shades of blue and green and stamped the images on Kraft. I wanted to use pink and emboss the images on vellum for a different look.

Here is my card –

Thinking of You

I started this card with white card stock cut to a standard size card. I also cut the pink stitched patterned paper from the kit to the same size to cover the entire front of the card. For the stamped panel, I cut a piece of vellum to 5 1/4 by 4 and prepped it for embossing with my DIY powder tool. I stamped the flowers and stems at the bottom of the vellum piece with Versamark and then embossed it with the Martha Stewart white embossing powder. I stamped the sentiment from the Thinking of You stamp set included in the kit also with Versamark and then I embossed it.

I attached the vellum panel with some glue dots which was a big mistake. I originally thought the glue dots weren’t going to be seen since I already used it before on vellum with another card. But as soon as I stuck the vellum to the card base, I immediately saw the glue dots. I couldn’t remove it without tearing the card, so as damage control I dug out some old sequins I had and tried to randomly place them around the card covering up the glue dots. I actually like it with the sequins so I’ll call that a happy mistake.

That’s it for this card. Thanks for reading! I will be back on Wednesday with a card and a new video. See you!

Wednesday Card Day – You Are Missed

Hi everyone!

Today’s post  is a resurrection of some sort. I started the Wednesday Card Day feature on my blog on October 2012. It was a way for me to share a card every Wednesday but after 3 posts, WCD just never happened again. I was busy and many things had to take top priority. When I again started blogging about my cards, they became random posts that just were posted any day. You can check out my previous Wednesday Card Day posts here, here and here.

I have decided to start Wednesday Card Day again and this time I’ve added a twist. I’ve been wanting to try and start making process videos for YouTube, so WCD posts will contain a video every single time. I am going to try my best to really keep up and post every Wednesday.

Wednesday Card Day Intro

So here is my card  –

You Are Missed

I started this card with some Neenah Dessert Storm card stock cut to a standard size landscape card. For the front panels, I used the watercolor effect papers from Basic Grey’s Fresh Cuts collection. I cut each paper into 3 3/4 x 1 1/2 strips of paper. I placed them side by side and stamped some of the flowers and the leaf from the Thinking of You stamp set from Simon Says Stamp usingVersaMark ink. Then I heat embossed the strips with white embossing powder from Martha Stewart. I then arranged the strips in the same order on the card base.

For the sentiment, I cut a 1 1/2 inch strip of vellum and stamped the sentiment You Are Missed from the same SSS stamp set. To finish the card I adhered the strip with glue dots towards the bottom.

You can watch the video here –


Thanks for reading 🙂

Thanks

Hey everyone! Today’s card is an entry for the Simon Says Stamp Wednesday Challenge

wednesdayblog-logo

wed-newchallenge-header

The theme for this challenge is – ANIMAL ANTICS. They are featuring Lawn Fawn stamps – and I love LF so much 🙂 so I decided to also use LF stamps since they have many cute animal images.

Here is my card —

Thanks

I started this card with some Bazzill Basics card stock in Feather Boa folded to a standard size card with the fold on top. I recently purchased a pack of note cards from Studio G with different kind of die cut images on the card. This particular one had a talk bubble as its die cut. I cut the card to a narrow panel and distressed the entire frontof the panel with some Angel Pink ink from Memento with a sponge dauber.

One of my favorite Lawn Fawn set is the Critters in the Forest and I always keep going back to that set. I love the owl, bird and the hedgehog. I stamped the log and hedgehog and stamped the bird on top of the hedgehog a couple of times to make it look like they are standing on top of each other trying to reach the talk bubble. Then I colored the entire image with some American Crafts Chromatix Markers. I am trying very hard to learn how to blend alcohol markers and I am still a work in progress. I will eventually get Copics when I think I am good enough and it will be worth the expense. 🙂

Every time you order directly from LF’s website, with your order they send a thank you stamp that can also be used with your projects. One of the stamps I received is the talk bubble thanks stamp and I thought it would be perfect for the card since there was already the die cut talk bubble image on the panel. I used VersaMark ink and white embossing powder from Martha Stewart. I stamped the sentiment directly on the Feather Boa card stock approximately where the die cut from the panel would be.

Then I adhered the panel using foam adhesives. I chose a floral pink toned pattern paper from Basic Grey’s Out of Print collection. I cut the paper into 2 1/4 strips of paper and adhered them close together. To finish the card, I rounded the bottom edges.

SUPPLY LIST:

1. Bazzill Basics card stock in Feather Boa
2. Studio G Talk Bubble die cut notecard
3. Lawn Fawn’s Critters in the Forest set
4. Lawn Fawn’s complimentary Thanks stamp
5. American Crafts Chromatix Markers
6. Basic Grey Out of Print 6×6 paper pad
7. VersaMark ink
8. Memento Tuxedo Black ink
9. Memento Angel Pink ink
10. Martha Stewart white embossing powder

That’s it for today. Thanks for reading 🙂

So Thankful for You

Hey everyone! Today’s card is a combined entry for the Simon Says Stamp Wednesday Challenge and the 10 Minute Craft Dash.

For the Simon Says Stamp Wednesday Challenge, the theme was ANYTHING GOES

wednesdayblog-logo

wed-newchallenge-header

For the 10 Minute Craft Dash, the color scheme for this week was Rose, Light Orange and Cornflower Blue.

CD_24

Here is my card which I finished in 9 minutes and 16 seconds 🙂

So Thankful For ZYou Flowers


I started this card with some Neenah Creative Collections card stock in Colonial Blue cut to a standard size landscape card. Then on some Neenah Solar White card stock, I stamped the Martha Stewart Stamp Around the Page set using the flowers from the Antique Borders collection. I colored the stamped image. This was very simple coloring. I used the American Crafts Chromatix Markers. I did not do any shading because for sure I knew I would go past the 10 minutes if I did. But I think it still looks ok without shading. For the sentiment, I used a set from Studio G and stamped in Memento Tuxedo Black ink. I tied a blue variagated/ombre embroidery floss from DMC and and rounded all four corners of the white panel. To finish the card, I adhered the entire panel on the blue card stock with foam adhesives.

SUPPLY LIST:
1. Neenah Creative Collections card stock in Colonial Blue
2. Neenah Solar White cardstock
3. Martha Stewart Stamp Around the Page in Antique Borders
4. Memento Tuxedo Black Ink
5. Studio G So Thankful for You stamp
6. DMC Variagated Blue embroidery floss
7. American Crafts Chromatix Markers


Thanks for reading 🙂


Thanks Friend

Hey everyone 🙂

Todays card is an entry for the Simon Says Stamp Wednesday Challenge. The theme for the challenge is …  ANYTHING GOES!

wednesdayblog-logo

wed-newchallenge-headerI made this card a while back and put it on my list of “cards to be blogged about”. But unfortunately, time and personal commitments did not allow for me to focus on my blog for a few months.

I learned this technique from Jennifer McGuire during the Pattern Play Online Card Class. Her technique was stamping on patterned paper or the Emboss Resist technique.

Here is my card  —

Thanks Friend 2

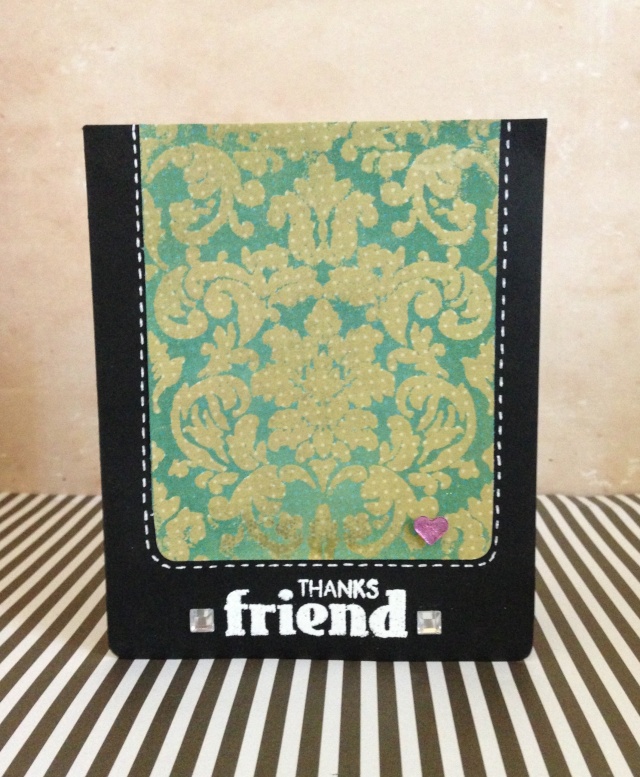
I started with card with some Bazzill Basics card stock in Licorice Twist folded on top to make a standard size card. I used a green tone paper from ColorBok’s Flea Market paper collection and I stamped the Stampabilities Tapestry Fabric background stamp in VersaMark ink. Then I embossed the entire piece of paper with the Martha Stewart clear embossing powder. I used some Broken China distress ink from Tim Holtz and covered the entire paper for the embossed image to pop. The places that had embossing powder resisted the ink and the places without, got covered in ink (thus the name – emboss resist). I attached a tiny heart punch from some shiny pink paper from the same ColorBok paper collection. I rounded the bottom corners of the panel and adhered it with Scrapbook Adhesives. For the sentiment, I used a stamp from Studio G and embossed it with white embossing powder from Martha Stewart. I also used some square gems from Studio G on both sides of the sentiment. To finish the card, I rounded the bottom corners and drew white faux stitiching lines around the patterned paper panel.

SUPPLY LIST:
1. Bazzill Basics Licorice Twist card stock
2. ColorBok’s Flea Market Paper Collection (main panel and punched heart)
3. Martha Stewart Clear Embossing Powder
4. Martha Stewart White Embossing Powder
5. Studio G Thanks Friend stamp set
6. Stampabilities Tapestry Fabric background stamp
7. Tim Holtz Distress Ink in Broken China
8. VersaMark ink
9. Studio G square gems
10. Hampton Art mini heart punch
11. Sakura white gel pen
 

Thanks for reading 🙂


Flying By To Say Hi

Hey everyone. Today I’m sharing a card I made a while back for a friend but never blogged about it. This was a technique that I learned from Kristina during the Pattern Play Online Card Class. The topic was on how to make the most of large patterns. This was an idea Kristina shared for her card which I really liked.

Here’s my card —

Flying By To Say Hi

I started this card with some Neenah Dessert Storm card stock as the base for the card. This is a standard size landscape card with the fold on top. For the patterned paper, I used a print with large butterflies from ColorBok’s Miso Pretty collection. I cut the paper to 4 x 5 1/4 and then further cut it into triangles. I adhered each piece with a small  gap between them to give it a panel look. Then I cut a piece of clove card stock from Neenah into a 3/4 inch strip. I used the stamp from Lawn Fawn’s Flying By To Say Hi as the sentiment for the card with Versamark ink and the Martha Stewart white embossing powder. I also accented the strip and made a ribbon edge. I choose a butterfly die cut from the ColorBok Miso Pretty 12×12 collection and adhered that with foam adhesive. I finished off the card by rounding the bottom corners.

SUPPLY LIST:
1. Neenah Dessert Storm card stock
2. Neenah Creative Collection Clove card stock
3. ColorBok Miso Pretty patterned paper (butterfly paper and butterfly die cut)
4. Lawn Fawn’s Flying By To Say Hi (stamp (sentiment only)
5. VersaMark Ink
6. Martha Stewart white embossing powder

That’s it for today. Thanks for reading! 🙂

Wednesday Card Day – Simple Birthday Cards (October 10, 2012)

For today’s Wednesday Card Day, I made 3 simple birthday cards that can easily be replicated or altered to fit the recipients personality. I love making birthday cards because they come in so handy and everybody you know will at some point celebrate their birthday.

Happy Birthday Flowers

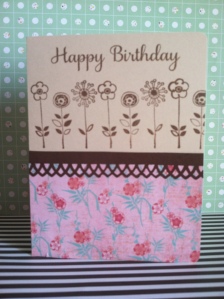
For this card, I started with some cream card stock from The Paper Company and layered it at the bottom with patterned paper from ColorBok’s Miso Pretty 12×12 paper pad. For added interest, I attached a border strip with the Martha Stewart Crafts Arch Lattice edger on brown card stock. Then using brown chalk ink, I stamped the Happy Birthday sentiment from the Operation Write Home stamp set by Hero Arts. I finished it off with a flower row using the Imaginisce Princess Petals stamp with the same brown chalk ink.

Hi Cupcake! 

All the papers I used for this card (card stock and patterned paper), are paper scraps that I wanted to use up. I used a light blue card stock and layered it with a plaid patterned paper. I got a strip of a marble effect paper and attached a border strip using the Martha Stewart Arch Lattice Edger. Then I got some cream card stock and stamped the Hi Cupcake sentiment from the Cupcake Stamp Set from TPC Studio with Memento Tuxedo Black ink. To finish the card, I used a Sakura white gel pen to create a faux stitching line around the card. The entire lay-out of the card is proof that I have been watching too many card videos of Kristina! 🙂 🙂 🙂

A Cupcake Birthday 

I used black card stock for the base of this card from The Paper Studio. For the neon background, I used a similar chevron technique that Kristina Werner (@starofmay) used in one of her Friday Focus videos. I used just regular neon computer for this. Using the TPC Studio Cupcake stamp set, I stamped this trio of cupcakes and used permanent markers to color it in. I adhered it on to the card using dimensional adhesive. I stamped the Happy Birthday sentiment from the Cupcake and Ice Cream Snag ‘Em collection from Imaginisce. I layered that with some blue neon computer paper made made ribbon edges. To finish the card, I used a Sakura white gel pen to create a faux stitching line around the card.

Enjoy making your own birthday cards! It’s definitely a lot of fun! 🙂