Sending You A Latte Thanks

Hi everyone! I’me here with a card for the Coffee Lovers Blog Hop hosted by Chaitali and Amy . I am addicted to coffee and I couldnt pass up the chance to participate in this hop.

15152067469_61f557acdf

Fortunately, the Simon Says card kit for October was coffee themed and it was the perfect oppurtunity to make a coffee themed card.

Here is my card —

Sending A Latte Thanks

I started this card with a standard size card with the fold on top from some Dark Chocolate card stock from Simon Says Stamp. To make the border, I cut 1/8 inch strips of patterned paper from Basic Grey’s Grand Bazaar 6×6 paper pad. I also inked a scrap piece of paper with versamark and embossed it with gold embossing powder from American Crafts. From the embossed paper, I cut more 1/8 inch strips for the border. I attached the strips on each edge of the card base to make the border frame.

For the focal image, I stamped the coffee mug from the What’s Brewing set from Simon Says Stamp in Versafine Onyx black ink on the yellow patterned paper from Basic Grey’s Grand Bazaar collection. I colored the small part of the coffee with a brown marker and also colored the inside of the mug with a yellow marker. I stamped the label “Java Nice Day” for the front of the mug. For the steam coming from the coffee, I heat embossed the image with gold embossing powder.

For the sentiment, I used the Latte Thanks sentiment and stamped it with VersaMark and heat embossed it with gold embossing powder.

That’s it for this card. Be sure to check out Chaitali’s blog for all the details for the blog hop! Happy National Day of Coffee!

For the complete list of the products I used, please check the supply list below.

Thanks for reading!

SUPPLY LIST: 

You’re So Cool – SSS August 2014 Card Kit

Hi everyone! I’m here today with another card for the Simon Says Stamp August 2014 Card Kit. I have been recently enjoying the 4 Bar card size so this is a 4 Bar card.

This card is an entry for the Simon Says Stamp Wednesday Challenge.

wednesdayblog-logo


wed-newchallenge-header


The theme for this challenge is ANYTHING GOES.


This card is also an entry for A Blog Named Hero‘s current challenge. The theme for this challenge is OMBRE.

challenge-50

Here is my card — (I’m sorry for the picture quality. It was a very gloomy day and I could not get a better picture.)

You're So Cool

I started with a panel of Tim Holtz Distress watercolor paper cut to 4 5/7 by 3 1/2. I used the smooth side and stamped the circle border from the Ice Cream Dreams repeatedly to create a background and I heat embossed it with white embossing powder. To create the ombre look, I used distress inks in Picked Raspberry and Spiced Marmalade from Tim Holtz. I started on top with the Picked Raspberry and finished with Spiced Marmalade at the bottom. I made sure to blend both the colors at the center for a red orange color.

For the focal image, I stamped the 3 ice cream images from the set and colored them in with a variety of alcohol markers. After cutting them out, I attached it to a Sizzix Border Frame. Before adhering the frame, I distressed the edges with the Tim Holtz distress ink in Antique Linen.

For the sentiment, I stamped the You’re So Cool sentiment with black pigment ink and then heat embossed with clear embossing powder. I cut the sentiment  into a thin strip and made banner edges on each end. I also distressed the edged with Antique Linen distress ink before adhering it to the card with foam tape.

I placed the front panel on a 4 Bar card base made from Neenah Solar White card stock.

That’s it for this card.

For a list of  products I used for this card, please check out the supply list below.

Thanks for reading!

SUPPLY LIST: 

Wednesday Card Day – On Your Special Day

Wednesday Card Day Intro

Hi everyone! I’m here today with a card using the supplies from the Simon Says Stamp May 2014 Card Kit. Now I’m going to be honest but I had a very difficult time thinking of cards that I wanted to make with this kit. Maybe my lack of experience in making masculine cards was the culprit. But I finally came up with something simple. I will try and make more with this kit to try and stretch my creativity.

Here is my card —

On Your Special Day


I started this card with Neenah Solar White card stock cut to a standard size card. I covered the entire front panel with the tweed/chevron patterned paper from the Be Different collection from Fancy Pants included in the kit. For the image and sentiment panel, I cut some Neenah Solar White card stock to 4 1/2 by 3 3/4. On the panel, I adhered 2 of the sneaker images from the SSS All Boy stamp set included in the kit. One was colored blue and the pink. I colored the images using Bic Mark It markers and I accented some parts with some Wink of Stella clear glitter pen. For the sentiment, I used the Card Phrases set from Stampabilities. I cut the stamp so it would fit on the front. I stamped the first and last part of the sentiment with Staz-On Jet Black ink and the I stamped the scripted sentiment with SSS Lipstick Red ink. To finish the card, I added a heart in between the 2 sneakers to make it look like a wedding themed card. I accented the heart with Elmer’s red glitter glue. I also rounded the corners of the front panel for added interest.

That’s it for this card. You can watch the video process here below or on YouTube


SUPPLY LIST:

1. Neenah Solar White card stock
2. Simon Says Stamp May 2014 Card Kit (patterned paper and stamp set)
3. Memento Tuxedo Black ink
4. Staz On Jet Black ink
5. Bic Mark It Markers
6. Elmer’s Glitter Glue
7. Stampabilities Card Phrases stamp set
8. SSS Lipstick Red ink

Wednesday Card Day – Just Arrived

Wednesday Card Day Intro

Hi everyone! I was recently at Michael’s and they had a huge sale on their older stamps and when I saw two baby themed sets from Fiskars and Stampendous, I couldn’t resist. So I decided to use them for today’s cards. Here is my first card —

Just Arrived Girl

I started this card with some Bazzill card stock in Cotton Candy cut to a standard size card. I used some of the mini images from both sets to create my own background. I repeatedly stamped the images in Versamark and then heat embossed it with some Martha Stewart clear embossing powder. I originally wanted to use sparkle embossing powder but I did not like way it looked so I changed my mind and used clear instead.

For the front panel, I cut the third biggest die from the Sizzix Fancy Labels #3 die set from white card stock. I positioned the stork and sentiment from the Fiskars set and stamped it with Memento Tuxedo Black ink. I colored in the image with an assortment of marker brands – I used the Fine Touch markers from Hobby Lobby and a few Bic Mark It markers. I don’t really know how to blend alcohol markers so I normally just do fast coloring and try to blend based on what I think looks right.

To finish the card, the attached the front panel with foam squares and applied some glitter to the baby blanket with my Wink of Stella clear glitter pen.

I also made a blue version for a baby boy —

Just Arived Boy

For this card, I did the exact same thing as I did with the pink card except that the card stock I used was Robin’s Egg Blue from Bazzill.

SUPPLY LIST
1. Fiskars stamp set  – Special Delivery
2. Stampendous stamp set – Baby Invite
3. Bazzill card stock in Cotton Candy (girl card) and Robin’s Egg Blue (boy card)
4. Neenah Solar White card stock 
5. Versamark ink
6. Memento Tuxedo Black ink
7. Martha Stewart embossing powder
8. Bic Mark It markers (Pink Flamingo and Yellow Blaze)
9. The Fine Touch Markers from Hobby Lobby ( CG1, CG3 Cool Gray, YR25 Salmon Pink, PB76 Sky Blue) 
7. Sizzix Fancy Labels #3 (3rd biggest die)
 
 You can watch the video here —


Thanks for watching

Bloom Where You Are Planted

Hey everyone!

Bloom Where You are Planted

I started this card with some yellow card stock from The Paper Company. It is a standard size landscape card with the fold on the top. I used the flower from the Daisy Phrases Good Day Sunshine collection from We R Memory Keepers. I randomly stamped the flower on the yellow card stock with some Cantaloupe ink from Memento for a tone on tone look. Then I attached a strip of floral patterned paper from Basic Grey’s Out of Print 6×6 paper pad. I don’t have a die cut machine so I free handed the plaque shape and stamped the sentiment from a Studio G set. I colored the word BLOOM with some Bic Mark It Markers. I used some brads from an office supply store and some green paper twine from Tim Holtz as accent pieces. To finish the card, I rounded the bottom corners.

SUPPLY LIST:
1. yellow card stock from The Paper Company
2. We R Memory Keepers Good Day Sunshine Collection – Daisy Phrases set
3. Memento Cantaloupe ink
4. Basic Grey Out of Print 6×6 pad
5. Studio G stamp (Bloom Where You Are Planted)
6. Tim Holtz paper twine
7. Brads
8. Bic Mark It Markers
 

Thanks for reading! 🙂

Mustache Birthday

Mustache Birthday

20130628-193652.jpg

I started this card with some water color paper from Strathmore. Normally I never use watercolor paper in place of card stock, but I really liked the texture and color of the paper so I decided to use it. On the top and bottom of the card, I used a sheet of patterned paper from ColorBok’s Nightingale collection. For the sentiment and design, I used 3 sets from Lawn Fawn. For the mustache, I used the stamp from the Dad’s Day. I also stamped the small party hat from the Hats Off To You set and colored it in with Bic Mark It markers. For the sentiment, I stamped the happy birthday greeting from the Year One birthday set. I used Memento Tuxedo Black ink for all the stamping. For the finishing touches, I punched a small heart on blue card stock and accented it with Ranger Stardust stickles then I used a black gel pen to create faux stitching lines around the edges.

SUPPLY LIST
1. Strathmore watercolor paper
2. Nightingale 6×6 pad from ColorBok
3. Lawn Fawn Dad’s Day (mustache)
4. Lawn Fawn Year One (happy birthday sentiment)
5. Lawn Fawn Hat’s Off To You (small party hat)
6. Memento Tuxedo Black ink
7. Bic MarkIt markers
8. The Paper Studio blue card stock
9. Studio G heart punch
10. Ranger Stardust Stickles
11. Uni Ball black gel pen

My Secret…a hobby that keeps me busy :)

From my school days aside from English which was my favorite subject, Art and any sort of Home Economics class would come second. I always loved expressing myself creatively. I liked cooking, crafting, stitching, crocheting (recently started knitting-thanks to Helga), jewelry making and any kind of do it yourself project was my thing. I remember the time I got bitten by the crafting bug was in middle school when we were asked to make baskets from newspaper strips. I enjoyed myself so much that after I submitted my project, I went home and made more of those baskets in different colors and sizes to put around my room.

I decided to start a blog in April of 2011 when I was still living in Manila. The main focus of the blog was really food. I blogged about food trips and things I cooked. Even when I moved to the States shortly after that, I continued with the food theme until I started crafting again. Then I got introduced to card making. My love for card making was a surprise to me because I preferred going to a store and picking out a card. But something about it being handmade with a personal touch, just made me love it even more. So since I started making cards, that has been the focus of my blog. That doesn’t mean I wont be doing food related, DIY or craft posts anymore. There are plans for that eventually.

I have remained anonymous on my other twitter account and didn’t reveal my name, but I have finally decided to let my Oncer friends in on my secret. My personal twitter is mostly about Once Upon A Time and most of the friends I have made there is because of the show. And on my other account, I have mostly craft sites, crafting friends, chefs and people who I really don’t converse with.  So I decided after thinking long and hard that its best to let my Oncer friends know what I’ve been up to. I talked to many people about this (thanks Kat – @slaykatart) and decided that it would be best to share my craft with the people who know me (even just through the internet).

You can follow this blog by email for updates on future posts and also follow @mycraftkitchen on Twitter by either searching it directly on twitter or clicking the follow button on the right part of the screen.

For this reveal, I created a special card for all you Oncer friends (its meant to be a Happy Birthday card – and it has that greeting inside) but I made it whimsical just like our favorite show. Enjoy!

OnceUponATime

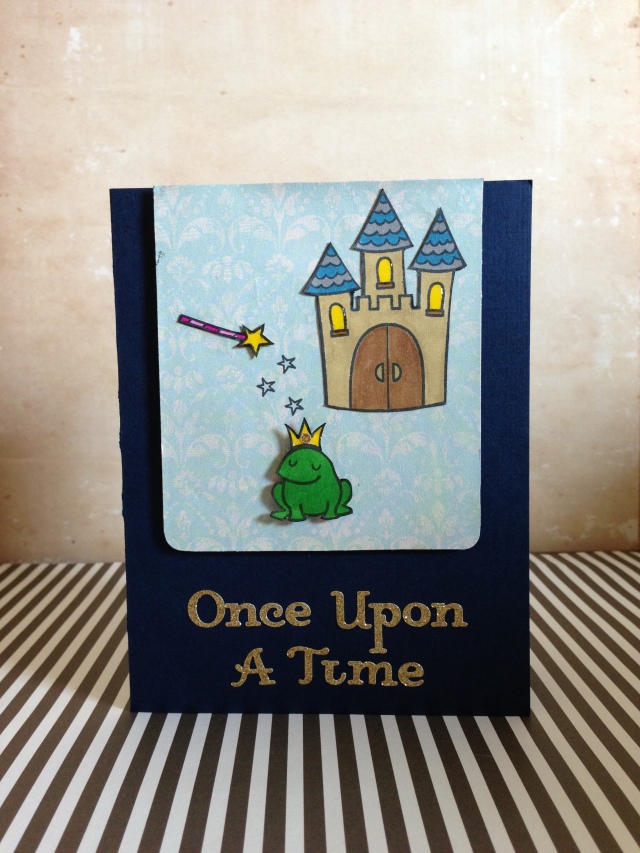
I used some Bazzill Basics card stock in Night Mist and folded it to a standard size A2 card (5 1/2 x 4 1/4). I used a piece of patterned paper from ColorBok’s Flea Market paper collection and used it as a center panel. For the images, I stamped the critters from Lawn Fawn’s Critters Ever After set in Memento Tuxedo black ink on white card stock. I colored them in with Bic Mark It markers. I accented the castle windows, the crown and the star on the wand with some Glossy Accents. For the custom sentiment, I used the Making Memories Gold Diva Alpha Stickers. I couldn’t fit the dot of the “i” on the word time, so instead I used it to accent the frog’s crown.

SUPPLY LIST

1. Bazzill Basics card stock in Night Mist
2. ColorBok Patterned Paper Collection in Flea Market
3. Lawn Fawn Critters Ever After
4. Bic Mark It Markers
5. Glossy Accents
6. Making Memories Gold Diva Alpha Stickers
7. Memento Tuxedo Black Ink 
8. The Paper Studio white card stock 
 

I hope you liked the card and hopefully I get to share more with you! 🙂 🙂 Until next time dearies!


Have A TWEET-tastic Christmas

**This card is for the Lawn Fawn CHA and Winter Catalog Challenge 

Have A TWEET-tastic Christmas

Tweetastic Christmas

For this card, I used a red card stock from The Paper Company and layered it with a plain green computer paper. For the top layer, I stamped the bird from Critters in the Forest in diagonal lines. I colored the birds in red and green Bic Mark It markers alternately. I used some green and red stickles to accent their feathers. I made a custom sentiment using Claire’s ABCs. To finish the card, the distressed the edges of the front panel with some Dessert Sand ink from Memento and I rounded the corners.


I Heart You

**This card is for the Lawn Fawn CHA and Winter Catalog Challenge 

I Heart You I H U

On a standard size kraft card stock from The Paper Company, I stamped the medium chevron pattern from the Chevron Backdrops set alternately in Rhubarb Stalk and Paris Dusk inks from Memento. I adhered the front panel on a Bazzill card stock in Nightmist, then I stamped an alphabet block using Claire’s ABC and highlighted the I and U in Rhubarb Stalk. For the heart, i punched out one with red card stock. I accented the heart with some red stickles. To finish the card, I used the mini heart border from the Winter Owl set.

Thanks Friend

**This card is for the Lawn Fawn CHA and Winter Catalog Challenge 

Thanks Friend

Thanks Friend

Thanks Friend

I used brown card stock from The Paper Studio for this standard size card and layered it with kraft card stock also from The Paper Studio. For the picture, I stamped the hedgehog, tree branch, bird, and firefly from Critters in the Forest on white cardstock. After coloring and cuting, I adhered it on water color paper which I distressed with Tim Holtz distress ink in Broken China to look like a sky. I sat the 2 birds on top of the hedgehog and the hedgehog on to the branch. I stuck the firefly to look like it was flying around. I placed the blue distressed paper under the kraft card stock where I made a circle window. I stamped the sentiment “Thanks Friend” from the same critter set.

To finish the card, I drew white faux stitching lines with a Sakura white gel pen.