Happy You’re My Friend

Hi everyone! I’m here today with a card and video using Simon Says Stamp products.

Here is my card —

Happy Youre My Friend

I filmed the process it took to create the card. You can watch the video here or on YouTube.


That’s it for the card. Thank you for reading.

CHALLENGES ENTERED

This card is an entry for the Simon Says Stamp Wednesday Challenge.

wednesdayblog-logo

wed-newchallenge-header

The theme for this week’s challenge is Anything Goes.

This is also an entry for the Virginia’s View Link Up Party Challenge

Panama-322

For a full list of products and tools I used, please check the supply list below:

SUPPLY LIST:

http://static.inlinkz.com/ppr.js

Celebrate Today, and Everyday

Hi everyone! I’m here today with a new card using some Paper Smooches products.

Here is my card —

Celebrate Today and Everyday

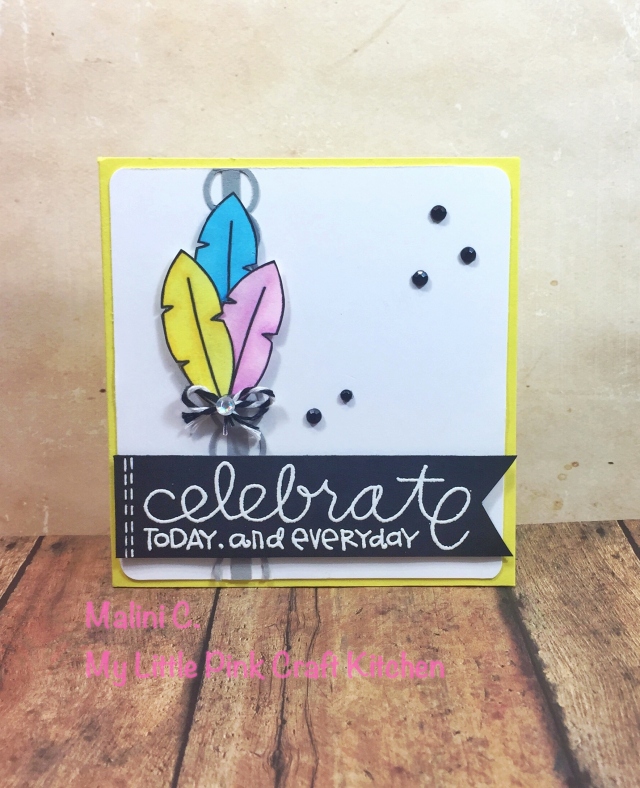
I started this card with a Core’dinations yellow card base which I cut to a 4 1/4 x 4 1/4 card. Then I cut a piece of Neenah Solar white to 4×4 to be the front panel. For the images, I used some free digi images from the Paper Smooches blog. I colored the feathers with Copic markers (check the supply list for all the colors I used).

For the border strip, I cut the scallop punch from American Crafts on Simon Says Stamp Smoke card stock. I adhered that to the left side of the front panel. On top of the strip, I placed a bunch of feathers, which I tied with some black twine from Doodlebug, I finished the bow with a gem Hero Arts.

For the sentiment, I used the Pretty Phrases from Paper Smooches and embossed it on Black Licorice card stock from Bazzil.

To finish the card, I added some stitch lines on the setiment strip and added more gems from Hero Arts around the card.

That’s it for this card. Thank you for reading.

For a full list of products and tools I used, please check the supply list below: (InLinkz to follow)

  1. Core’dinations Bright Smooth A2  cards and envelope (yellow)
  2. Neenah Solar White card stock
  3. Simon Says Stamp Smoke card stock
  4. Bazzil black licorice card stock
  5. American Crafts Knock Outs – scalloped punch
  6. Paper Smooches Pretty Phrases
  7. Paper Smooches Feather freebie
  8.  Copic Markers – (PINK – RV000, RV52, RV55 BLUE – B01, B04, B06 YELLOW Y00, Y13, Y18)
  9. Doodlebug Black Twine
  10. AC Zing White embossing powder
  11. Sakura Gelly Roll white pen
  12. Hero Arts white / black gemstones
  13. Tombow tape runner
  14. Scotch foam tape

SMILE – It’s Your Birthday

Hi everyone. I’m back with a new card for you today – well not really a new card. I made this card a few months ago and life happened before I was able to post this. So here I am today sharing this card.

Here is the card —

Smile Its Your Birthday

I started this card with a card base from Core’dinations. I cut the largest rectangle from the MFT Stitched Rectangle Stax from Neenah Solar White card stock. I created a circle template and colored it in using different colors of Tim Holtz Distress inks to create a rainbow ink blended effect.

For the sentiment, I cut the smile die cut from Little Yellow Bicycle from Bazzil Black Licorice card stock. To make it look like an embellishment, I added some Wink of Stella to the entire word and then finished it off with Glossy Accents. After it dried, it looked like an enamel accent which I really liked. I will definitely do that more often. For the second sentiment, I spelled out the words using Lawn Fawn’s Milo’s ABC and embossed it with white embossing powder on black card stock.

To finish the card, I added some black enamel dots from My Mind’s Eye to give it a finished look.

That’s it for this card.

I really feel productive and hopefully this continues until next year. Four months in a craft funk is no joke. I’m pretty excited to be creating again – stress free.

For a full list of products and tools I used, please check the supply list below: (InLinkz to follow)

  1. Core’dinations Bright Smooth A2 cards and envelopes (blue)
  2. Neenah Solar White card stock 80 lb
  3. Bazzill Black Licorice card stock
  4. My Favorite Things Stitched Rectangle Stax
  5. Little Yellow Bicycle “Smile” die
  6. Lawn Fawn Milo’s ABC
  7. Tim Holtz Distress Ink (in rainbow order) – Fired Brick, Spiced Marmalade, Mustard Seed, Peacock Feathers, Mermaid Lagoon, Seedless Preserves.
  8. American Crafts Zing white embossing powder
  9. Clear Wink of Stella pen
  10. Glossy Accents
  11. My Mind’s Eye Charmed black enamel dots
  12. Tombow tape runner
  13. Scotch foam tape


Happy Birthday! (Lawn Fawn Critters)

Hi everyone! I’m here today with a birthday card I made using Lawn Fawn stamps.

Here is my card –

Happy Birthday Critters

(I’m sorry for the picture quality but it was quite dark and gloomy when I took this picture and I had to do a lot of editing to make this picture bright.)

I started this card with a 4 bar Neenah Solar White card base. I attached the piece of patterned paper with the same size as the card base from the Lawn Fawn Daphne’s Closet paper collection. For the front panel, I stamped various critters from different Lawn Fawn Stamps. I used the masking technique to make the critters look like they are behind and/or in front of each other. When I finished stamping, I colored the images with Copic markers. For the sentiment, I stamped the birthday sentiment from Year 1 using Versafine Onyx black ink and clear embossing powder.

I centered the biggest stitched rectangle die from My Favorite Things on the image to create the stitched panel. To finish the card, I adhered the panel to base with foam tape and highlighted the party hats with the Zig Clear Wink of Stella glitter brush.

This card is an entry for the Simon Says Stamp Wednesday Challenge. The theme for this week is Anything Goes.

wednesdayblog-logo

wed-newchallenge-header


For a complete list of all the tools and products I used, please check the supply list below.

That’s it for this card. Thanks for reading.

SUPPLY LIST

  1. Neenah Solar White card stock
  2. Lawn Fawn Critters in the Forest
  3. Lawn Fawn Hats Off To You
  4. Lawn Fawn Year 1
  5. Lawn fawn Year 3
  6. Lawn Fawn Daphne’s Closet 6×6 paper pad
  7. Assorted Copic Markers – B01, B04, Y00, Y13, Y18, RV000, RV52, RV55, E70, E74, E79, N0, N2, R17, G43, G46, G94, G99, BG11, BG13, E13, E15, E18, 
  8. My Favorite Things Stitched Rectangle Die
  9. Elmer’s Tape Runner
  10. Scotch Foam Tape
  11. Zig Clear Wink of Stella Glitter Marker

(I will post an InLinkz Supply List as soon as a I can.)


Love, Laugh, Smile

Hi everyone. I’m here today with a card for the Pretty Pink Posh Watercolor Bloghop.

watercolor.bloghop

I have yet to be successful coloring an image with watercolor or do some no line coloring, so I decided to do something I am sure I know how to do – create a background with watercolors.

Here is my card —

IMG_6247

I also made a video with the steps I used to create this card. You can watch it below or on YouTube.


That’s it for this card. Thank you for reading.


Happy Birthday! – Get Sketchy Challenge with Joni

Hi everyone. I’m here with a card for the Get Sketchy Challenge with Joni.

JoniSketch1

I love this sketch and I love Joni’s work so I was inspired to join this challenge.

Here is my card –

IMG_6187


I also made a video where you can watch the process of me making my card. You can watch it here or on YouTube

The supply list will be up shortly.

Thanks for reading!

SUPPLY LIST:


DO RE MI-ssing You

Hi everyone! I’m here today with a card for the CAS-ology Challenge. The CUE CARD for this week is MUSIC.

Week 146 - Music

I was trying to think of a way to interpret music and I had a “You Are My Sunshine” card at back of my head. But I definitely wanted to try and think outside the box. Then an idea hit me, and I think this could be one of my favorite card I’ve made. The card came out exactly how I imagined it which is rare for me. It may not be clean and simple with a lot of white space, but i think grey is pretty close. 🙂

Here is my card —

DO RE MIssing You

I die cut the letters / words DO, RE, MISSING, and YOU from different colors using the My Favorite Things Bright Lights Alphabet. I wanted to create a pun on words so I created a space between MI and ssing. For an accent image, I didn’t have any large music note stamp or die cut, so I found a clip art online and cut it. I emembellishedhe note with some Clear Wink of Stella pen and then layered with Glossy Accents.

For the card base, I used a standard size top folding card in Simon Says Stamp Smoke card stock. I stamped the music notes stamp from the Teeny Tiny Backdrops from Lawn Fawn is Hero Arts Soft Granite ink.

That’s it for this card.

For a complete list of all the tools and products I used, please check the supply list below.

Thanks for reading.

SUPPLY LIST:

12 Days of Christmas Cards Day 5 – I’ll Be Home For Christmas

12 Days of Christmas


Hi everyone! Welcome to Day 6 of my 12 Days of Christmas Cards. Before we begin, I just wanted to remind you that I have a giveaway happening on my blog at the moment. For all the details on how you can enter, check out this post. 

For day 6, I wanted to do a missing you/I’ll see you soon at Christmas card. So using stamps from Hero Arts and Sweet Stamp Shop, I made a holiday town scene.

Here is my card —

ill Be Home for Xmas

I created a video showing the process in which I created the card. You can watch it below or on YouTube.

For a complete list of the tools and products I used, check out the supply list below.

That’s it for this card. Thanks for watching and reading. See you soon for Day 6.

SUPPLY LIST: 

12 Days of Christmas Cards Day 3 – Season’s Greetings

12 Days of Christmas


Hi everyone! I’m here with Day 3 of my 12 Days of Christmas Cards. I wanted to apologize for the lack of posts, I have just been caught up with many things and had barely any time to craft. I will definitely finish all 12 days before Christmas day. Thank you for your patience.

My #12DaysofXmas giveaway is still going on till December 26. Check out the details here.

Today’s card is a fun one. It is an easy card to mass produce since you get many parts with every die cut. I also created a box for the cards. I learned the sizes of the box from this post and video that Jennifer McGuire shared.

Here is my card and box

Season's Greetings

I also created a video showing the process in which I made the card. You can watch it below or on YouTube.

For a complete list of the tools and products I used, check out the supply list below.

That’s it for Day 3. Thanks for reading. See you soon for Day 4.

SUPPLY LIST:


You + Me

Hi everyone! I’m here today with a card for the RetroSketches Challenge Blog. This is Challenge #132 and here is the sketch I used

rs132


Here is my card —

You and Me


I started this card with some Bazzill card stock in Fawn cut to a standard size card with the fold on top. I used a polka dot pattern from Pink Paislee’s Pen Pal collection for the bottom layer. For the focal image, I used the Sizzix Labels #3 as the panel. On top of the panel, I used the You and Me die from Sizzix and die cut the boy and the girl in more of the Pen Pal paper from Pink Paislee. I used the blue and pink heart paper to match boy and girl.

For the sentiment, I die cut the sentiment die You + Me using the same pink and blue paper and  I inlaid the letters  again to match. For the +, I colored white card stock with a red marker and die cut the +. To finish the card, I accented the letters and the heart above the boy and girl with the Clear Wink of Stella pen and then I added Glossy Accents on the heart to give it some dimension.  I attached both panels with foam tape.

That’s it for this card.

For list of the products I used, please check the supply list below.

Thanks for reading.

SUPPLY LIST: