Love, Laugh, Smile

Hi everyone. I’m here today with a card for the Pretty Pink Posh Watercolor Bloghop.

watercolor.bloghop

I have yet to be successful coloring an image with watercolor or do some no line coloring, so I decided to do something I am sure I know how to do – create a background with watercolors.

Here is my card —

IMG_6247

I also made a video with the steps I used to create this card. You can watch it below or on YouTube.


That’s it for this card. Thank you for reading.


I Only Have Eyes For You

Hi everyone!

Today I’m sharing a card for the Create A Smile March Guest Designer Call.

Guest Designer Call

The guest call will run until February 13 so if you’re interested, go and check it out here.

For this card, I decided to use one of the freebies they have on their website. Here is my card —

IMG_5084

Recently I have been enjoying using digital stamps. I used a Newton’s Nook freebie and I purchased some from Gerda Steiner and now I’m using another freebie from Create A Smile. I will always love clear stamps and I will never stop using them, but digi’s are pretty cool to use once in a while.

I started this card with a panel of Neenah Solar White card stock that measures 5 x 3 3/4 inches. I wanted to color some embossing paste so I used Audrey Blue and Doll Pink from Simon Says Stamp to color some white embossing paste from Wendy Vecchi. I used a chevron stencil from Heidi Swapp and did alternate colors of the paste.

For the focal panel, I cut the image from the Lawn Fawn Stitched Journaling card but I wanted the top to have a straight edge but still keep the stitched detail – so I used the straight border die from the Stitched Borders 2 from Pretty Pink Posh to cut the top part.

I colored the bird with some Copic markers. I will mention the colors in the supply list below. For the sentiment, I was struck with the bird’s big eyes so I wanted to use a puny sentiment related to that. I stamped the sentiment from the Only Have Eyes for you set from Simon Says Stamp with Versafine Onyx black ink and embossed it with clear embossing powder.

To finish the card, I adhered the stitched panel to the chevron piece and I adhered the chevron panel to a standard size card from Neenah Solar White. I also added  Glossy Accents to the eyes of the bird and his stomach. I used enamel dots from My Mind’s Eye to tie in all the colors together.

That’s it for this card.

For a complete list of all the products and tools I used, please check the supply list below.

Thanks for reading.

SUPPLY LIST

Simon Says Stamp July 2014 Card Kit Completed

Hi everyone! I’m here today to share a few cards that I made with the Simon Says Stamp July 2014 Card Kit. I made a total of 11 cards for this kit. I already shared 3 and I will share another 3 today. I have a 7th card that I will share tomorrow. As for the balance 4 cards, they were mostly inspirations from the inspiration sheet we received with the card kit so I won’t be sharing those anymore since they were mostly CASE cards.

The Simon Says Stamp Card Kit is an awesome deal. It is a monthly subscription of card making supplies with a theme each month. To purchase each kit is 24.95 on its own. If you decide to subscribe it will be 19.95 which is reasonable price since you are getting a full size stamp set every month. I love receiving the kit each month because it definitely helps kick start my creativity.

Now for the first card —

Thinking of You Chevron

I started this card with a standard size Neenah Solar White card stock with the fold on top. For the chevron design, I am using my favorite technique which Jennifer McGuire demonstrated here. I love chevrons and when I saw Jennifer’s tutorial, I knew I would be doing this all the time. For the chevron pattern, I used the patterned papers from Pink Paislee that was included in the kit. Instead of using the chevron stripes as a whole sheet, I decided to cut each strip so I could place them randomly on the card. I ran the stripes on my Xyron Sticker Maker to make it easier to stick.

For the sentiment, I used the sentiment from the stamp set included in the kit. I stamped it using Lipstick Red ink from SSS. I also randomly stamped some of the hearts around the sentiment the same red ink. To finish the card, I accented the hearts with some Clear Wink of Stella pen and locked the shine with some Glossy Accents.

Here is the second card —

Thinking Of You

For this card, I was inspired by a card I saw at my local grocery store. I forgot to take a picture but it had stripes printed on the background so I knew I wanted to use strips of paper using the Pen Pal collection. I chose a few patterns and cut them into 1/4 inch strips. I started sticking the strips at the center and worked my way to each side. I decided to  arrange them randomly with different heights. I used Neenah Desert Storm as my main card base. The card is standard size with the fold on  top.

For the main element, I cut a circle using the Sizzix Circle Framelits set from the same kraft card stock. I embellished it with the typewriter, heart and thought bubble puffy stickers from the Pen Pal collection from Pink Paislee.

And here is the final card —

Hello Circles

I started this card with some Neenah Solar White card stock cut to standard size card. Using the patterned papers, I cut 1 inch circles and adhered in 2 lines on the front of the card. For the sentiment, I used the round hello greeting from the same set. I embossed it on Blueberry card stock from Bazzill using the AC Zing Gold Metallic embossing powder. I stuck the other circles straight on to the card stock but for the Hello sentiment, I adhered it using foam squares for added dimension.

I had some left over strips from the previous card, so I cut one side at a diagonal and adhered it to the card. To finish, I rounded the bottom corners.

That’s it for this post and card kit. For more information on the tools and supplies I used for the cards, please check the supply list below.

Thanks for reading!

Just Saying Hello

Hi everyone! I’m here today with a card for the Simon Says Stamp Wednesday Challenge.

wednesdayblog-logo

wed-newchallenge-header

The theme for this challenge is LET’S BE CLEAR! Any clear item can be used. For this card, my clear items are – a clear card base and clear embossing powder.

This card is also an entry for the Lawnscaping Challenge Blog.

Challenge 85


The theme for this challenge is to use the summer color combo provided in the graphic above.

Here is my card —

photo 2


I started this card with a 3 1/4 x 4 1/2 piece of Neenah Solar White card stock. I stamped the Lawn Fawn Chevron Borders stamp with Memento inks in Bahama Blue, Dandelion and Tangelo alternately on the panel. For the sentiment, I used a sentiment from the Trult Appreciated set from Hero Arts. I stamped it with black pigment ink and clear embossed it. We were allowed to use little bits of black and white so I wanted the sentiment to stand out. To add a little more black and white elements, I added some enamel dots from My Mind’s Eye.

For the card base, I didn’t have those fancy pre-cut clear cards, so I just used thick transparency sheets from Staples and made my own clear card base. I rounded the corners of the main panel and stuck it on the front of the card and I also stuck coordinating pieces white card stock to cover the adhesives.

For a complete list of tools and supplies, please the supply list below.

That’s it for this for this card.

Thanks for reading!


Wednesday Card Day – On Your Special Day

Wednesday Card Day Intro

Hi everyone! I’m here today with a card using the supplies from the Simon Says Stamp May 2014 Card Kit. Now I’m going to be honest but I had a very difficult time thinking of cards that I wanted to make with this kit. Maybe my lack of experience in making masculine cards was the culprit. But I finally came up with something simple. I will try and make more with this kit to try and stretch my creativity.

Here is my card —

On Your Special Day


I started this card with Neenah Solar White card stock cut to a standard size card. I covered the entire front panel with the tweed/chevron patterned paper from the Be Different collection from Fancy Pants included in the kit. For the image and sentiment panel, I cut some Neenah Solar White card stock to 4 1/2 by 3 3/4. On the panel, I adhered 2 of the sneaker images from the SSS All Boy stamp set included in the kit. One was colored blue and the pink. I colored the images using Bic Mark It markers and I accented some parts with some Wink of Stella clear glitter pen. For the sentiment, I used the Card Phrases set from Stampabilities. I cut the stamp so it would fit on the front. I stamped the first and last part of the sentiment with Staz-On Jet Black ink and the I stamped the scripted sentiment with SSS Lipstick Red ink. To finish the card, I added a heart in between the 2 sneakers to make it look like a wedding themed card. I accented the heart with Elmer’s red glitter glue. I also rounded the corners of the front panel for added interest.

That’s it for this card. You can watch the video process here below or on YouTube


SUPPLY LIST:

1. Neenah Solar White card stock
2. Simon Says Stamp May 2014 Card Kit (patterned paper and stamp set)
3. Memento Tuxedo Black ink
4. Staz On Jet Black ink
5. Bic Mark It Markers
6. Elmer’s Glitter Glue
7. Stampabilities Card Phrases stamp set
8. SSS Lipstick Red ink

Just Knowing You Makes Me Happy

WC_participant

Hi everyone! I’m here today with a card for the Online Card Classes current class – Watercolor for Card Makers. Before I share my card, I just wanted to inform my lovely readers that I will not be having a Wednesday Card Day video this week. I’m quite wrapped up with the class I wont have time to edit between my job and time I want to spend playing with the different techniques we are learning in class. However, I will try to post my homework cards everyday (which is what I have for you today). I will defintely have a video next week.

Now on to my first homework card –

Just Knowing You Makes Me Happy

The first lesson was creating watercolor backgrounds and Jennifer Rzasa showed a technique using stencils which I really found unique and interesting. Now I have a confession to make, I don’t really have a proper watercolor palette and I wasnt sure if I wanted to purchase one since I already had my Inktense pencils and Distress Ink pads and markers to use. So when I saw the Crayola 8 color Palette at my local grocery store, I decided to try and test my skills before purchasing a better palette. To my surprise, I loved the effect. This card was created entirely with the Crayola 8 color set and the paintbrush included.

On some Strathmore watercolor paper, I used 3 different colors – red, orange and yellow and I let them blend within each other. The stencil I used was the Chevron stencil from The Crafter’s Workshop. For the sentiment, I used the Color and Sunshine set from Simon Says Stamp using Staz-On Jet Black ink.

To finish the card, I adhered the watercolor panel on to a Bazzill Black Licorice card base.  I also added some Sparkling Clear sequins from Pretty Pink Posh and black enamel dots from My Mind’s Eye.

That’s it for this card. I will try to be back today with another homework card.

Thanks for reading.


You Brighten My Day

Wednesday Card Day Intro

Hi everyone! Today’s post is a Wednesday Card Day post — and yes I know it’s Friday but things have been hectic and I haven’t had the chance to sit down and write a blog post. Finally some free time came about and now I am sitting writing this post.

I really love the Simon Says Stamp Card Kits and there have definitely been a few kits that I cannot stop using and others which I don’t use as much. This months kit is definitely those “I cannot stop using” kits. I love everything about the kit and the stamp set is pretty awesome.

So here is my card using the April Kit – even though its already May 🙂

You Brighten My Day


I really wanted to have a pink and black color effect card since its one of my favorite combinations. I also love the stamp set and decided to use silver embossing powder. I’ve had the Zing silver embossing powder and for some reason it never gave me the metallic finish that I wanted. I recently went to Michael’s and saw their Recollections line and loved a lot of the embossing powders. I tried the silver and champagne which are now my two favorite colors and definitely has made Recollections my favorite brand of embossing powders after the Hero Arts white.

For the final embellishment, I have been recently loving sequins as it is growing in popularity. I found these sequins in my stash. My mom made a backdrop cloth for my sisters wedding and these were the extra sequins. There were a lot left so I took them to use for cards. I added the sequins inside the heart and on the inner border of the light bulb.

Here is a video of the card process which you can watch here or on YouTube.


SUPPLY LIST:
1. Simon Says Stamp April 2014 Card Kit  (Doodlebug black chevron paper, SSS exclusive stamp – You Brighten My Day)
2. Neenah Solar White card stock
3. Bazzil Candy Hearts card stock
4. The Paper Studio A2 Dots embossing folder
5. Vellum
6. Recollections Silver Detail Embossing folder
7. VersaMark ink 
8. Mini silver sequins 
 

That’s it for today. Thanks for reading and watching!


SSS January 2014 Card Kit – Completed

Hi everyone! I’m here with an update for the Simon Says Stamp January 2014 card kit. Starting with the January kit, I will be doing a post like this at the end of the month to close out the kit. I have already blogged about 4 cards I have made and you can read them here, here, here and here. To close out this kit, I have made 4 additional cards.

For cards 5 and 6, I wanted to use the ticket strips from Fancy Pants since I haven’t touched it.

Card #5 – Happy Valentines Day (Ticket Strips)

Happy Valentines Day - Ticket Strips

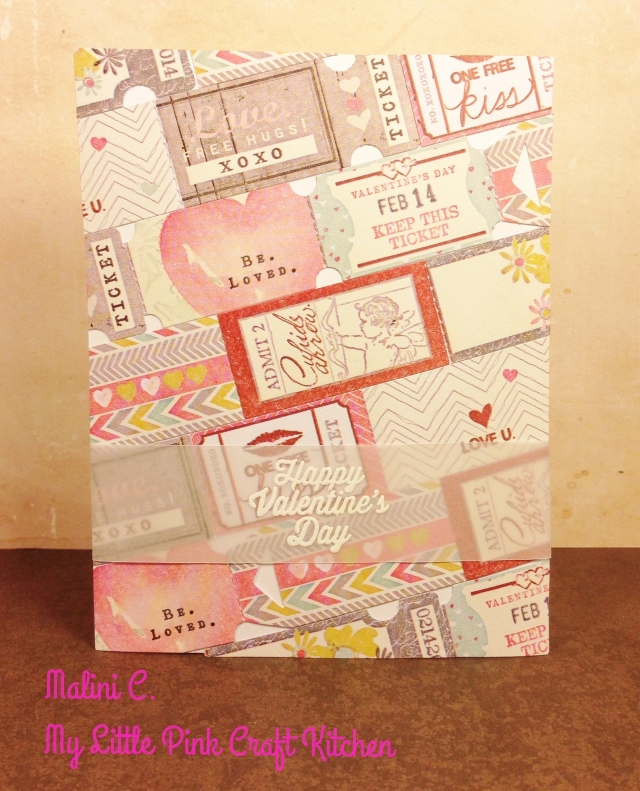
For this card, I used the ticket strips as a border through out the front panel of the card. I attached it to the front of a white standard size card base. For sentiment, I stamped it on vellum with Versamark ink and embossed with white embossing powder. I have always used flour as my powder tool but recently I made my own powder tool which I will blog about. It only cost me 2 dollars and I think it works better than flour.

Card #6 – Be Loved, Love You

Be Loved Love You

For this card, I wanted to use more of the ticket strips. I saw this video from Kristina Werner using the January 2013 SSS kit and the focal point was a ticket strip. So I used her idea and CASE’d her card. I just love Kristina’s style of card making and her videos were what got me started in this hobby.

I made a border frame from the pink chevron paper and adhered it towards the center of the card. I used another paper strip from collection and punched a scallop border with the American Crafts Knockouts. I tied some twine included in the kit and placed a gem at the center of the bow. For the sentiment, I picked 2 ticket strips that could work as sentiments and attached it to the card.

Card #7 – Hello You! Love You! Be Mine?

Hello You Be Mine Love You
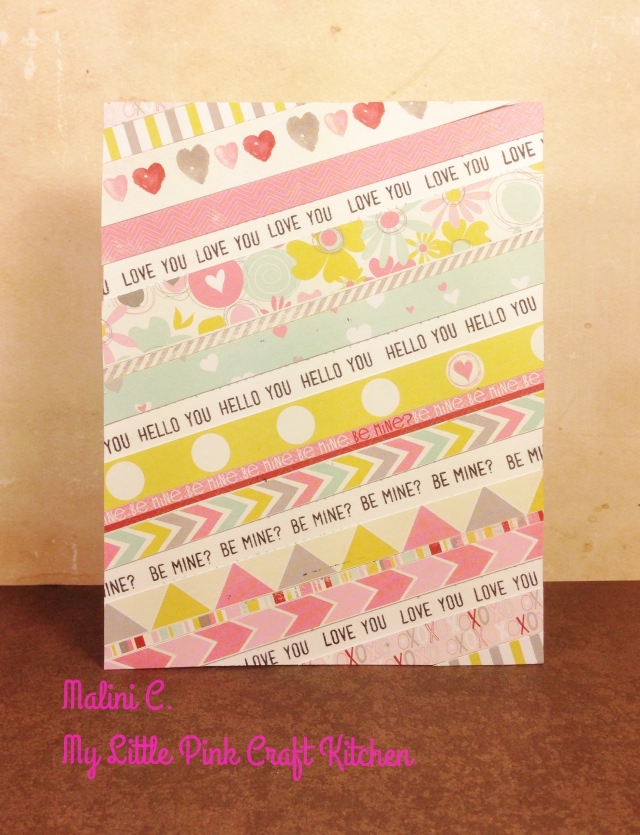
For this card, I used different strips of patterned paper from the kit and adhered them diagonally on the front panel. And in between the strips, I used the small sentiments from the Only Have Eyes For You set and repeatedly stamped it on the spaces with Memento Tuxedo black ink.

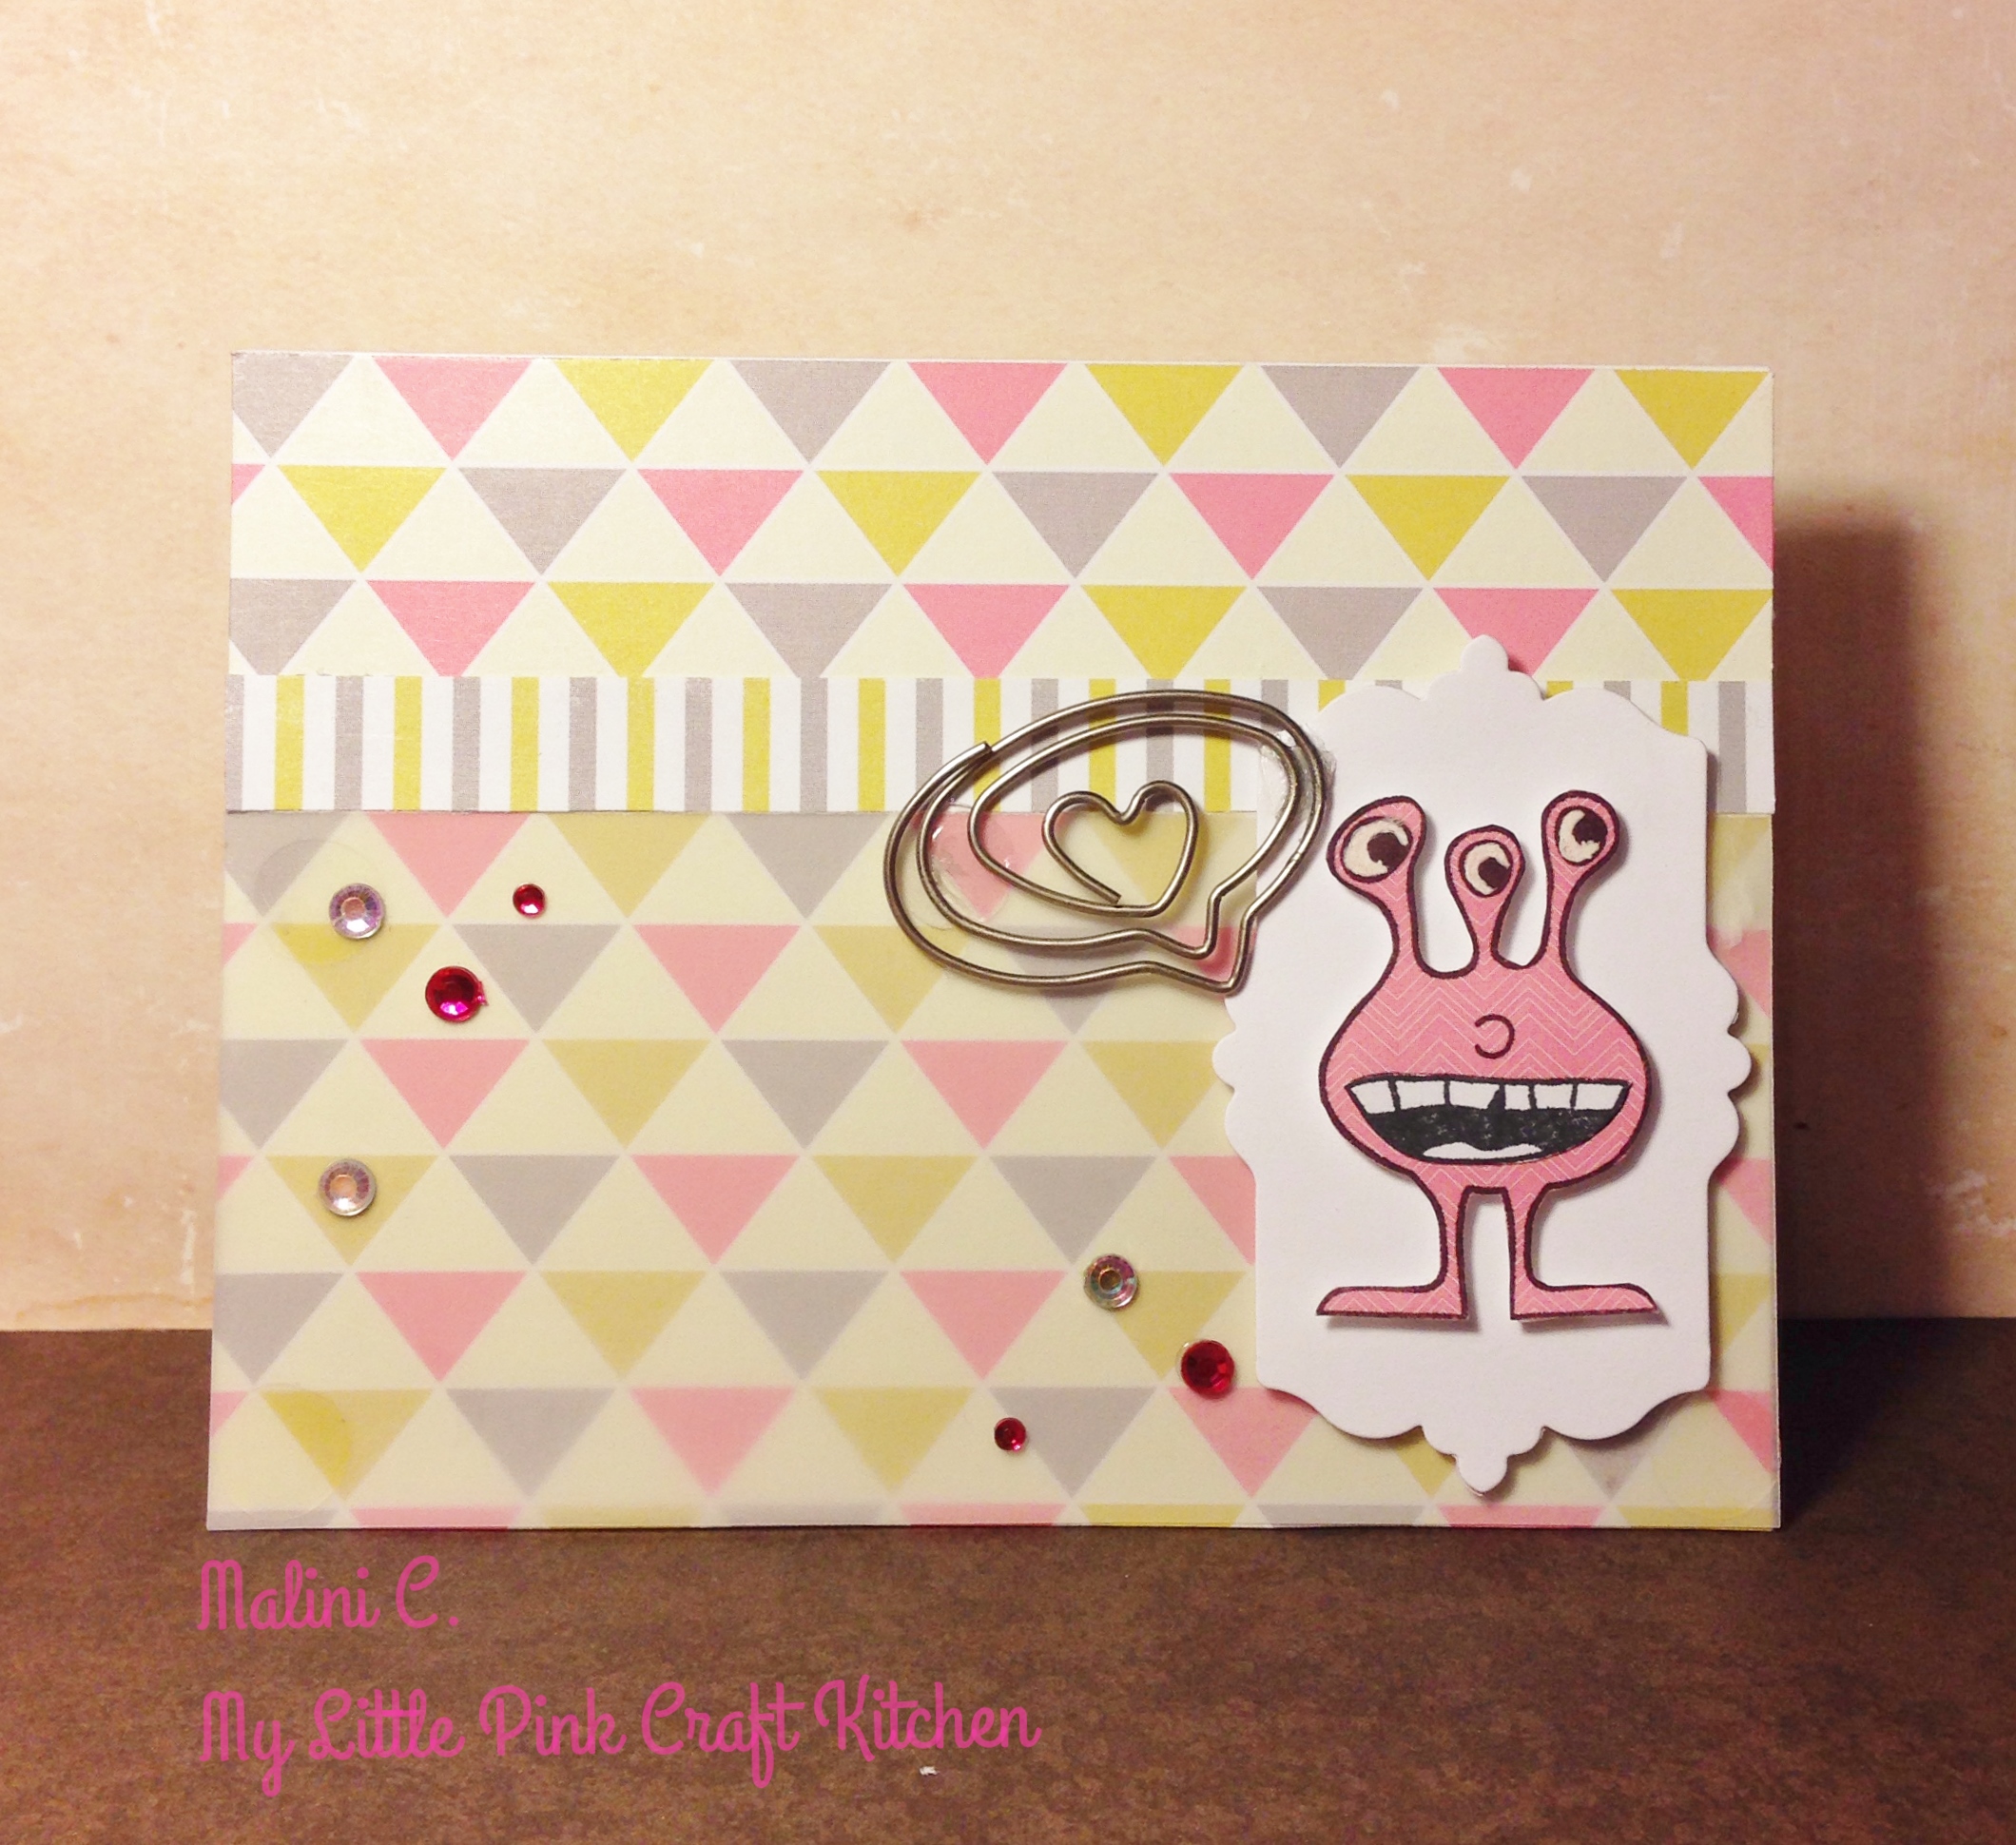
Card #8 – Hello You! I (Heart) You 

Hello You! I Love YouFor this card, I wanted the monster to be popping out of windows. I colored the monsters with alcohol markers trying to practice my color blending. I’m still a work in progress but I will never stop trying until I get it right. I used googly eyes to add some dimension. I used a small banner from Sizzix and stamped the sentiments from the set using white embossing powder. I used a strip of patterned paper and used the American Crafts KnockOuts to punch a heart border. To finish the card, I adhered the border and rounded the bottom corners.

That’s it for the January 2014 kit. Even though its quite late, I will make a few cards for the February Kit and blog about those cards.

Thanks for reading.

SSS January Kit Card #4 – OMG I Love You

Hi everyone! Today’s card is my 4th card for the Simon Says Stamp January kit. I still have a few ideas and I will probably have more than my normal 5 cards per kit. I also joined the most recent Online Card Class – Stenciled, so there will be lots of posts in the next few days.

For this card, I wanted to the focus to be on the beautiful patterned paper included in the kit from the Beloved collection from Fancy Pants. I love how bright, cheery and moderns the prints were. I also used this sketch that I found from the Paper Crafts and Scrapbooking blog a while back. I’m sorry if I’m not able to properly credit the owner of this sketch as I took a screen cap and forgot to copy the link.

Here is the sketch I was inspired by –

card sketchand here is my take on the sketch –

OMG I Love You


I started this card with some Neenah Solar White card stock cut to a square 4 1/4 by 4 1/4 card. I wanted to use the grey striped paper from the kit, but I had already used it for another card, so instead I used this grey chevron pattern covering the entire card base with from the Chalk Studio Collection from My Minds Eye. Then I used the patterned papers from the kit as the top pieces. I cut the striped paper using the biggest circle from the Sizzix Circle Framelits die, and the pink chevron using the fourth to the smallest die from the same set. For both the banners, I used the Framelits Banners #2 set. I adhered the paper pieces just like the sketch. Before attaching the pink chevron circle, I stamped the sentiment “OMG I (Heart) U” from Only Have Eyes For You stamp set included in the kit with Memento Tuxedo Black ink. To finish the card, I added some of the Hero Arts diamond gems also included in the kit and rounded the bottom corners.

That’s it for today. I will be back later today with a card from Day 1 of the new Stenciled Online Card Class. And within the next few days for more cards from the January Kit.

Thanks for reading!

SSS January Kit Card #3 – Heart Speech Bubble

Hi everyone! I’m here today with my 3rd card for the Simon Says Stamp Monthly Card Kit. This card will be an entry for the Retro Sketches Challenge #97  over at their blog. Here is the sketch I used as inspiration.

rs97

Here is my card using the supplies from the Simon Says Stamp January card kit —

Heart Speech Bubble

I started this card with some Marshmallow card stock from Bazzill cut to a standard size landscape card. I adhered the triangular patterned paper from Fancy Pants included in the kit on the entire front of the card. I then adhered a 2 1/2 by 5 1/2 piece of vellum towards the bottom of the card so that the pattern paper underneath would have a sheer effect. Looking at the sketch above, the sheer effect of the vellum was what I wanted to be the cut. But because it was too sheer and barely noticeable, I decided to place a strip of patterned paper from the same collection to accentuate where the vellum begins.

I die cut the second to the smallest frame from the Sizzix Fancy Labels #3 from more Bazzill Marshmallow card stock and I placed the monster image at the center with foam squares. I stamped the monster on pink patterned paper with a chevron detail from the Fancy Pants paper included in the kit. I paper pieced the mouth and eyes on white card stock and glued it to the image. I placed the speech bubble  paperclip as if the monster was saying something like I love you since it was a heart. To finish of the  card, I placed some clear diamond gems from Hero Arts and some pink gems from Hampton Art in random places for added interest.

That’s it for this card. I will try and make at least 2 more cards from this before the month is over. Thanks for reading! 🙂